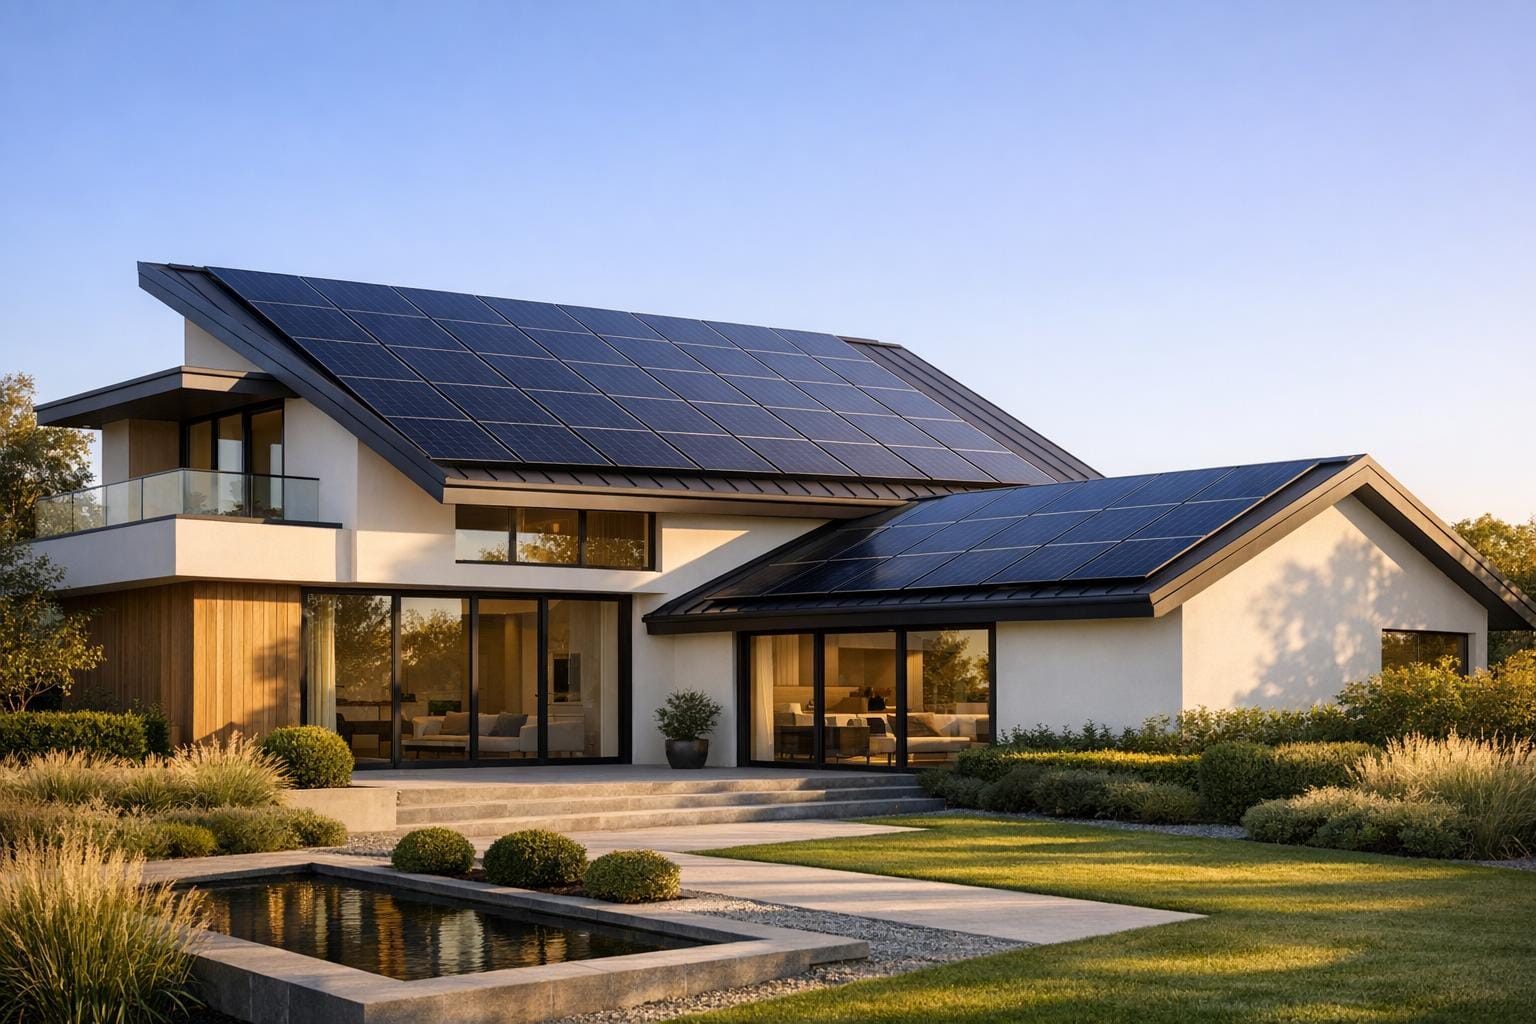
Solar panels can now blend seamlessly with your home’s design, offering energy savings without compromising your property’s appearance. With options like flush-mounted panels, solar tiles, and ground-mounted systems, homeowners in Northern Ireland can match their architectural style while reducing electricity bills by £310–£495 annually. Here’s a quick guide to making solar work for your home:
- Assess Your Roof: South-facing roofs are ideal, but east and west orientations also perform well. Ensure your roof can handle the extra weight and avoid shading.
- Choose the Right Panels: Flush-mounted panels provide a sleek look, solar tiles mimic traditional materials, and ground-mounted systems suit larger plots or heritage properties.
- Plan Placement and Colour: Arrange panels symmetrically, match colours to your roof, and opt for matte finishes to minimise glare.
- Work with Experts: Companies like EECO Energy ensure installations are efficient and visually appealing, with systems starting at £3,950.
Whether your home is modern or historic, solar can be tailored to complement its character while cutting costs and supporting renewable energy goals. Keep reading for practical tips on integrating solar panels with your home.
Assessing Your Home’s Architecture for Solar Panels
Evaluating your home’s structure is a crucial step in finding a solar solution that fits both functionally and visually. This process ensures the panels integrate well with your home’s design while maximising efficiency.
Understanding Your Home’s Exterior Features
Start by examining your roof’s orientation and angle. A south-facing roof is ideal, though any direction within 90° of south can still deliver solid performance. Check for shading caused by trees or nearby buildings, as this can significantly impact energy output.
Your roof must handle an additional weight of around 15kg/m². Most standard timber flat roofs, with a typical capacity of approximately 150kg/m², can support this load. If your roof is due for renewal, it’s a good idea to combine the upgrade with the solar panel installation.
The type of roofing material also determines how the panels will be fixed. For slate roofs, use specialised clamps or lead flashing to avoid drilling, which could cause cracks or leaks. Tile roofs require notching to anchor the panels securely, while lead roofs need timber blocks topped with lead caps. Additionally, you’ll need at least 5 m² of unshaded roof space that receives direct sunlight for most of the day to ensure efficiency.
For a polished look, arrange the panels symmetrically, aligning them with existing architectural features. Opt for black-framed or frameless panels with anti-reflective coatings to minimise glare. These choices work particularly well with the dark slate or tiled roofs commonly found in Northern Ireland.
Working with Heritage and Period Properties
Modern homes may find it simpler to adapt to these guidelines, but heritage properties require extra care. Listed buildings and homes in conservation areas often have stricter rules, with planning permission usually required. These installations must preserve the building’s unique character and avoid causing damage.
To maintain a historic building’s integrity, consider a sequential placement strategy. Start with ground-mounted systems, ideally screened by landscaping, then move to outbuildings, modern extensions, and finally the rear roof slope. Avoid placing panels on principal elevations to protect the building’s appearance.
Installations should also be reversible, allowing the panels to be removed after about 25 years without harming the original structure. Before beginning work, source matching replacement materials, such as slates or handmade tiles, as traditional materials can be difficult to replace if damaged. Additionally, check for protected species like bats or nesting birds, as their habitats are legally safeguarded. Timing the installation to avoid disturbing wildlife is essential.
Real-world examples highlight what’s achievable. Gloucester Cathedral installed 150 solar panels on its nave roof in 2016. These panels generate about 25% of the building’s energy while remaining invisible from the ground, thanks to the high roof pitch and parapet walls that preserve its historic skyline. Similarly, at King’s Cross Station, 1,392 custom-made glass laminate PV panels were integrated into the roof, producing 175,000 kWh of electricity annually and cutting over 100 tonnes of CO₂ emissions.
Before finalising your design, consult your local authority’s conservation officer. Installing bird guards during the process is also wise, as they prevent pigeons from nesting under the panels and damaging electrical wiring. With careful planning, even the most historically significant homes can successfully incorporate solar energy.
Choosing Solar Panel Types Based on Appearance
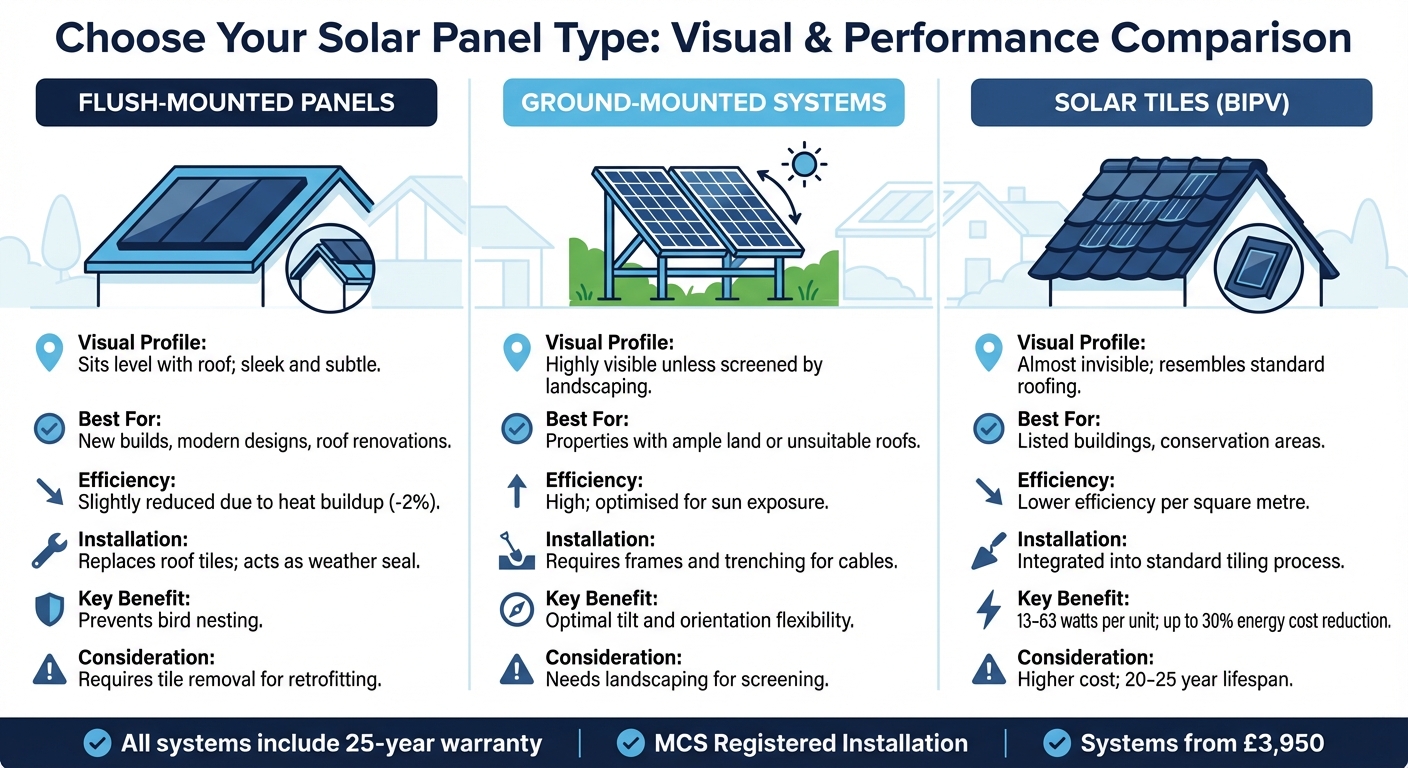
Solar Panel Types Comparison: Flush-Mounted vs Ground-Mounted vs Solar Tiles
The type of solar system you select can significantly impact your property’s overall look. Some systems blend seamlessly into the design of your home, while others, though visible, can still complement its aesthetic. Let’s break down how different types of solar installations offer unique visual solutions.
Flush-Mounted Roof Panels
Flush-mounted panels are designed to sit flush with the roofline by replacing sections of tiles or slates instead of being installed on top. This approach creates a sleek, discreet appearance that enhances the natural look of the roof. These systems are particularly suited for new builds or complete roof overhauls, as retrofitting usually involves removing existing tiles. An added bonus is that they eliminate gaps between the panels and the roof, which helps prevent birds from nesting – a common issue with standard installations. However, the reduced ventilation can lead to slightly higher operating temperatures, which may result in around 2% lower performance compared to on-roof systems.
If roof integration isn’t an option for your property, ground-mounted systems might offer a more flexible alternative.
Ground-Mounted Systems
Ground-mounted systems are a practical choice for properties where roof space is limited or unsuitable for solar panels. These systems are installed on metal frames, pile-driven posts, or concrete foundations, and they can be placed in gardens or larger plots. With the ability to tilt and orient the panels for optimal sun exposure, they deliver high efficiency while keeping your roof free of equipment.
The main drawback of ground-mounted systems is their visibility. Without proper landscaping, they can disrupt the visual flow of your garden. However, thoughtful use of hedges, fences, or other greenery can help screen the panels from view while allowing easy access for maintenance. For heritage properties, ground-mounted systems with effective screening are often preferred, as they avoid altering the historic character of the building.
If discretion is your top priority, solar tiles might be the perfect solution.
Solar Tiles and Shingles
Solar tiles and shingles, also known as building-integrated photovoltaics (BIPV), are designed to replicate traditional roofing materials like slate, clay, or stone. From a distance, they’re virtually indistinguishable from standard roofs, making them the most discreet option available. This feature makes them especially valuable for listed buildings and properties in conservation areas where maintaining the original character is essential.
Solar shingles typically generate between 13 and 63 watts per unit and can reduce energy costs by up to 30% compared to traditional roofing materials. Their lifespan is generally 20–25 years. However, they come with trade-offs: they’re more expensive than standard panels and usually produce less power per square metre due to their smaller cell surface area. Installation is also more complex, as they are integrated into the roof during the tiling process rather than being mounted later.
| Feature | Flush-Mounted | Ground-Mounted | Solar Tiles |
|---|---|---|---|
| Visual Profile | Sits level with roof; sleek and subtle | Highly visible unless screened by landscaping | Almost invisible; resembles standard roofing |
| Best For | New builds, modern designs, roof renovations | Properties with ample land or unsuitable roofs | Listed buildings, conservation areas |
| Efficiency | Slightly reduced due to heat buildup (-2%) | High; optimised for sun exposure | Lower efficiency per square metre |
| Installation | Replaces roof tiles; acts as weather seal | Requires frames and trenching for cables | Integrated into standard tiling process |
Planning Panel Placement, Orientation, and Colour
Once you’ve decided on the type of solar system that fits your property, the next step is figuring out the best placement and appearance for your panels. Getting this right not only boosts energy efficiency but also ensures your home’s aesthetics remain intact. The colour and finish of the panels are equally important, helping them blend harmoniously with your roof and overall architectural style.
Arranging Panels for Visual Balance
The energy output of your solar panels heavily depends on their orientation. As shown in the table below, south-facing roofs generate the most energy in the UK. That said, east or west-facing roofs with a 30-degree tilt still perform well, producing enough energy for most households. East-facing panels excel in capturing morning sunlight, while west-facing ones are better for afternoon and evening energy needs.
"South-facing panels might produce the most electricity overall, but that doesn’t mean solar isn’t worth it if your roof faces east or west. In fact, these orientations can still deliver strong performance and might even suit your energy habits better." – Energy Saving Trust
For an appealing and streamlined look, arrange the panels in a uniform block, keeping them parallel to the roofline. This avoids a cluttered appearance and maintains the visual balance of your roof. Ensure there’s a 40cm gap from the roof edge and limit any panel projection on pitched roofs to 200mm. These adjustments help reduce wind noise, minimise uplift risk, and comply with permitted development regulations.
If your property is a heritage building, preserving its historical character is crucial. Refer to earlier recommendations on strategic placement to ensure the architectural charm remains intact while embracing solar energy.
Now, let’s look at how panel colours and finishes can further enhance this balance.
Selecting Panel Colours and Finishes
Solar panels are typically available in black or blue. Black panels are a popular choice for their modern, understated look, blending seamlessly with dark slate or tiled roofs commonly found in Northern Ireland. Blue panels, while often more affordable, tend to stand out more against traditional roofing materials. For homes with grey slate roofs, grey-toned solar tiles or panels are an excellent option, offering a closer match to the existing roof.
However, some engineered solar slates have a shiny, glossy finish that might not suit the authentic style of older homes in the region. If you want the panels to integrate more naturally with your roof, go for matte-finish panels or solar tiles designed to mimic the texture of traditional roofing materials. For modern homes with sleek designs, glossy black panels can complement the contemporary aesthetic beautifully.
If you’re incorporating solar panels into a conservatory or a modern extension, transparent solar panels are worth considering. These provide shading, generate electricity, and still allow natural light to pass through, making them ideal for glass structures. Always check with your divisional planning office before installing panels, especially if your property is listed or located in a conservation area.
By carefully selecting the placement, colour, and finish, you can achieve a solar installation that not only meets your energy needs but also complements your home’s design.
| Roof Orientation | Tilt Angle | Output Percentage |
|---|---|---|
| South | 30° – 45° | 100% |
| South-East / South-West | 30° | 96% |
| East / West | 30° | 86% |
| North | 30° | 54% |
sbb-itb-d2d975a
Working with EECO Energy for Custom Installations

Custom Designs for Local Homes
EECO Energy kicks things off with a free on-site survey to evaluate key factors like your roof’s orientation, angle, structural condition, and shading [25,27]. This thorough assessment ensures your solar setup captures maximum sunlight while blending seamlessly with your home’s design.
The company employs its own team of installers, ensuring consistent quality from both a technical and aesthetic perspective. From the initial survey to the final installation – often completed in just one day – you’ll work with the same dedicated team. EECO Energy handles installations for homes, commercial properties, and even agricultural buildings across Northern Ireland.
Their modular system design offers flexibility for future upgrades. You can start small, based on your current energy needs and budget, and expand later if your household grows or energy consumption increases. This personalised approach also ensures the system is designed to minimise its visual impact on your property.
"Our solar panels are simple, cost-effective, and deliver proven results."
- Stuart Laing, Company Director at EECO Energy.
Lynsey, a customer from Belfast, shared her experience:
"As a family, we’re delighted with the performance we’ve seen from our solar system. My monthly bill is down 90% from ~£200 per month to £20 per month. It’s had a huge impact on our family".
EECO Energy guided Lynsey through every step, from explaining costs and potential savings to completing the installation quickly and efficiently.
Now, take a look at the range of system sizes available to find one that perfectly suits your home.
System Sizes and Visual Impact Comparison
EECO Energy provides five standard system sizes, carefully designed to balance energy production with minimal visual impact:
| System Size (kW) | Number of Panels | Annual Output (kWh) | Price |
|---|---|---|---|
| 4.5 kW | 10 | 3,380 | £3,950 |
| 5.4 kW | 12 | 4,400 | £4,350 |
| 7.2 kW | 16 | 6,189 | £4,850 |
| 8.1 kW | 18 | 6,685 | £5,700 |
| 9.0 kW | 20 | 7,099 | £5,900 |
With these systems, homeowners in Northern Ireland typically save between £50 and £180 each month on energy bills. Over the 25–30 year lifespan of a solar system, total savings often range from £15,000 to £25,000 – and can exceed £30,000 when paired with battery storage. Adding a battery, such as Dyness (£2,400), Soluna (£3,000), or Duracell (£3,650), can further increase monthly savings by 20% to 50%.
Every system includes a 25-year warranty and is installed by MCS Registered and Duracell Approved professionals across Northern Ireland [25,26]. While there are currently no grants for domestic solar installations in Northern Ireland, businesses may qualify for the Energy Efficiency Capital Grant, offering up to £150,000.
Keeping Solar Panels Looking Good Over Time
Once your solar panels are up and running, keeping them in good shape is relatively simple. Thanks to Northern Ireland’s frequent rain, heavy-duty cleaning isn’t often necessary – just the occasional touch-up for stubborn dirt or residues.
Cleaning and Regular Maintenance
Before you start cleaning, always switch off the system. A garden hose is usually enough to rinse off dirt from the ground. If a deeper clean is needed, use a long-handled brush or soft sponge with warm water and a mild soap. DIY cleaning kits are available and typically range from £25 to £120.
"You should not use a pressure washer on solar panels under any circumstances, as the high pressure may scratch or damage the panels. This may also void the warranty."
- Briain Kelly, Author, EnergyEfficiency.ie
For the best results, aim to clean your panels early in the morning or late in the evening. This avoids sudden temperature changes that could damage the panels, like cold water hitting hot surfaces. Use deionised or distilled water for rinsing to prevent mineral build-up. And remember – never walk on the panels, as this can lead to micro-cracks or structural damage.
Keep an eye on your system’s performance through a monitoring app. A noticeable drop in energy production might signal that your panels need attention. It’s also a good idea to inspect your panels visually once a year and schedule a professional deep clean every five years. Professional servicing, which typically includes cleaning and an electrical check, costs between £100 and £300. Routine care not only ensures optimal performance but also helps maintain your warranty.
Warranty and Maintenance Services
EECO Energy offers a 25-year warranty on your solar installation. To keep this warranty valid, avoid any cleaning methods that could harm the panels, such as pressure washing. Be prepared to replace the inverter after 10 to 15 years.
A professional electrical system check is recommended about 10 years after installation, with follow-ups every five years. These inspections can spot potential issues like water leaks, damaged wiring, or even nesting animals before they escalate. After severe storms, it’s also wise to visually inspect your panels to make sure no debris has built up or caused damage.
Taking these steps ensures your solar panels remain efficient and reliable for years to come.
Conclusion
By combining thoughtful design with a careful assessment of your home’s architecture, your solar installation can balance clean energy production with aesthetic appeal. With proper planning, you can generate renewable energy while maintaining – or even enhancing – your property’s visual charm. Whether you choose flush-mounted panels for sleek modernity, solar tiles to complement a period property, or a discreet ground-mounted system tucked away in your garden, there’s a solution to match your home’s style.
Take into account your home’s unique features when selecting panel types and finishes. Opt for designs that harmonise with your roof and consider arranging panels to create visual symmetry. For heritage properties or homes in conservation areas, starting with less prominent installations – like outbuildings or rear-facing roofs – can help preserve the character of your home while meeting your energy needs.
"The key to a successful solar installation is not just about the type of solar panel but also about how well it integrates with your home’s design and your lifestyle." – Matt Keane, Author and Home Improvement Specialist, BuildTech
Partnering with experienced professionals, like EECO Energy, ensures your system is both functional and visually appealing. With MCS accreditation, a 25-year warranty, and expertise tailored to Northern Ireland’s specific needs, professional installers provide peace of mind, knowing your panels will perform efficiently and look great for years to come.
A well-designed solar system is more than just a source of renewable energy – it’s a long-term investment that enhances your home’s appearance and delivers financial savings over time. By seamlessly blending form and function, your solar installation becomes a valuable and enduring improvement to your property.
FAQs
How can I make solar panels complement my home’s design?
To make solar panels complement your home’s aesthetic, consider roof-integrated panels or solar tiles that align with the colour and slope of your roof. Installing them on a south-facing side ensures they perform efficiently while keeping the design sleek and consistent. Using low-profile mounting systems can further reduce their visibility, which is especially important for homes with historic or distinctive features.
Working with a local installer is a smart move. They can guide you in choosing designs that match your home’s architectural character and help plan a layout that fits seamlessly with your property, all while ensuring compliance with local planning regulations.
What are the best solar panel options for historic or listed homes?
For historic or listed properties, choosing solar panels that blend effortlessly with the existing roof is key to preserving the building’s character. Building-Integrated Photovoltaics (BIPV), like solar slates or tiles, are an excellent option. These systems replace traditional roofing materials and are designed to match the original roof’s colour and texture. With their frameless, low-profile design and dark finishes such as black or blue, they’re nearly invisible from street level.
If BIPV isn’t a practical choice, a discreet roof-mounted array can work well. Opt for black-framed or frameless panels that complement the roof’s colour and pitch. Installing the panels on the least visible side of the roof helps minimise their impact. Wherever possible, conceal mounting hardware to maintain the property’s aesthetic. For listed buildings or homes in conservation areas, you’ll likely need planning permission and a heritage assessment before installation.
By carefully selecting and positioning your solar panels, you can embrace renewable energy without compromising the charm and heritage of your home.
How can I keep my solar panels efficient and looking their best over time?
To keep your solar panels in top shape, make it a habit to clean them regularly. Use water or a soft brush to gently remove dirt, dust, and debris that can accumulate over time. While you’re at it, inspect for cracks, loose connections, or overgrown vegetation that might cast shadows and lower their efficiency.
Additionally, consider arranging periodic check-ups with a qualified installer. They can ensure that critical components like the inverter and mounting hardware are still in good working order. By following these straightforward steps, you can maintain the performance and appearance of your solar panels for years to come.