Selecting the right solar provider in Northern Ireland ensures your system performs efficiently, complies with regulations, and maximises savings. A poorly installed system can reduce performance by 15–30%, costing you thousands in repairs and lost savings. Here’s what you need to know:
- Understand Your Energy Needs: Review your annual electricity use and consider future changes (e.g., EVs or heat pumps). Choose the right system size for your home.
- Check Property Suitability: Ensure your roof’s orientation, angle, and condition support solar panels. South-facing roofs with minimal shading work best.
- Verify Installer Credentials: Look for MCS accreditation and RECC membership. These certifications ensure compliance and access to financial benefits like 0% VAT and Smart Export Guarantee payments.
- Compare Quotes: Get detailed, itemised quotes including system components, installation costs, and warranties. Typical costs range from £5,000–£10,000, with payback in 7–12 years.
- Focus on Aftercare: Choose providers with strong local experience, reliable warranties, and robust maintenance services. Avoid high-pressure sales tactics.
Making an informed choice protects your investment and ensures long-term savings.
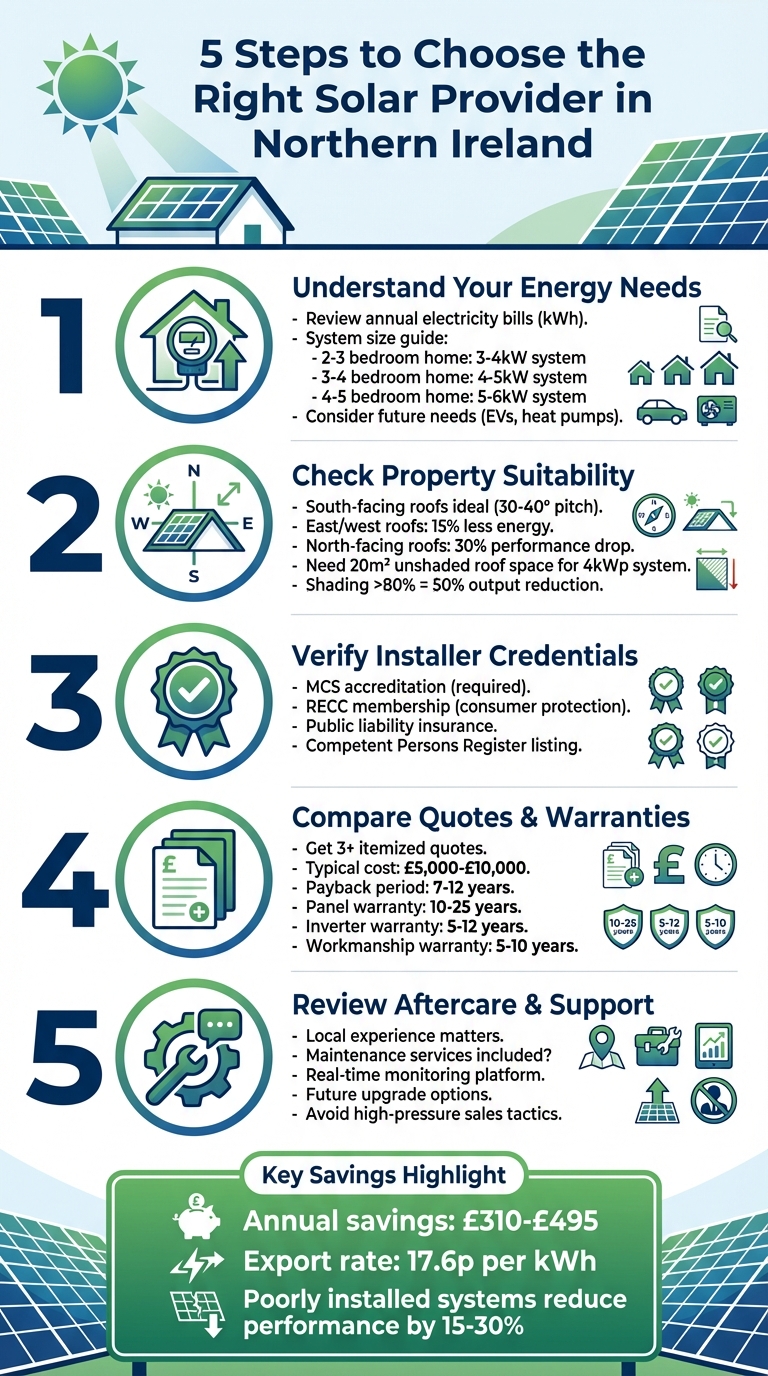
5-Step Guide to Choosing the Right Solar Provider in Northern Ireland
Identifying Your Solar Requirements in Northern Ireland
Before you reach out to a solar provider, it’s crucial to understand exactly what your property needs. Getting the system size wrong could mean spending more than necessary or ending up with a system that doesn’t perform as expected.
Calculating Your Energy Usage
Start by reviewing last year’s electricity bills to determine your annual energy consumption in kilowatt-hours (kWh). This figure serves as your baseline. Keep in mind that most households only use 15–25% of the electricity their solar panels generate because peak production often happens when no one is home. However, if you’re home during the day or plan to add battery storage, your self-consumption rate could increase significantly.
Think about any future changes to your energy needs. Are you considering an electric vehicle, a heat pump, or switching to electric cooking? If so, make sure to factor these into your calculations now. For reference, here’s a rough guide for system sizes based on typical homes in Northern Ireland:
- 2–3 bedroom home: 3–4kW system
- 3–4 bedroom home: 4–5kW system
- 4–5 bedroom home: 5–6kW system
To give you an idea, a well-positioned 3kW system (about 20 square metres of panels) can generate roughly 2,600kWh annually, which covers over 40% of the average household’s energy needs.
Checking Your Property’s Suitability for Solar Panels
Once you’ve calculated your energy requirements, it’s time to assess whether your property is suitable for solar panels. The orientation and angle of your roof are key factors. In Northern Ireland, south-facing roofs are ideal, especially if they have a pitch of 30–40 degrees. East- or west-facing roofs are also workable but produce around 15% less energy, while north-facing roofs can see a performance drop of up to 30%.
A standard 4kWp system typically needs around 20 square metres of unshaded roof space. Shading is a big deal: if more than 80% of your panels are shaded, your system’s output could be slashed by as much as 50%.
Before proceeding, check your roof’s condition. It must be strong enough to support the weight of the panels. If your property is in an Architectural Conservation Area or is a listed building, planning restrictions may apply. Also, panels should be installed at least 50cm from the edge of the roof. While southern parts of the UK receive about 20% more solar energy than the northernmost areas, Northern Ireland’s climate still supports solar power with the right setup.
Once you’ve assessed your energy needs and property suitability, you can consider additional equipment to maximise your system’s efficiency.
Deciding on Additional Equipment and Features
Battery storage is a smart option, especially if you’re on a day/night tariff like the Twilight Tariff. With this setup, you can charge your batteries during cheaper night rates in winter and switch to solar charging in spring and summer. Batteries can boost your self-consumption from 30–35% to as high as 70–80%, though they’re not cheap, costing between £5,000 and £8,000.
If your roof has shading from obstacles like chimneys or trees, power optimisers (£60–£80 per panel) or microinverters (£100–£120 per panel) can prevent shaded panels from dragging down the output of the entire system. For around £800, you could add a solar diverter to channel any excess electricity into heating your water tank instead of exporting it to the grid.
If you’re planning to charge an electric vehicle, a smart EV charger is a great addition. It allows you to use surplus solar energy to power your car. To ensure your system runs efficiently, match your battery size to the number of panels. For example:
- 8–10 panels: Pair with a 5–8kWh battery
- 12–16 panels: Pair with a 10–15kWh battery
Checking Accreditations, Compliance, and Standards
Once you’ve assessed your energy needs and made sure your property is suitable, the next step is to confirm your installer’s compliance. This is crucial to protect your investment. Proper accreditation ensures you can access government incentives, guarantees a safe and legal installation, and provides peace of mind throughout the process. So, it’s essential to verify that your installer meets all necessary standards and regulations.
Required Certifications for Solar Installers
In the UK, the Microgeneration Certification Scheme (MCS) is the gold standard for renewable energy systems, covering both systems and components. Without MCS certification, you won’t qualify for programmes like the Smart Export Guarantee.
"MCS is the UK’s quality mark for renewable energy systems like solar panels and heat pumps… providing protection and peace of mind as you make the switch to ‘home-grown energy’" – MCS
Additionally, your installer should be a member of a recognised consumer code, such as RECC (Renewable Energy Consumer Code) or HIES (Home Insulation and Energy Systems). RECC membership offers added security, including deposit protection insurance and a minimum two-year workmanship warranty. Also, ensure your installer has public liability insurance to cover any installation-related damage. After your panels are installed, it’s worth reviewing your home insurance to ensure everything is adequately covered.
Meeting Northern Ireland Regulatory Requirements
If you’re in Northern Ireland, there are specific regulations to follow on top of the standard certifications. Installers must notify the local Distribution Network Operator (DNO) about your solar installation. For single domestic systems, this notification must be made within 28 days. If multiple systems are being installed within 500 metres, an enquiry and impact assessment are required.
Your installer should also be listed on the Competent Persons Register, which allows them to self-certify that the work complies with local building regulations. This means you won’t need to submit a separate building notice. However, if your property is a listed building or located in an Architectural Conservation Area, you’ll need specific planning consent. A reliable installer will guide you through these requirements and handle all the necessary paperwork.
Asking for Certificates and Proof of Compliance
Before you even request a quote, use the official ‘Find an Installer’ tool to confirm your installer’s MCS certification. Once the installation is complete, the installer should provide a full handover pack within 10 working days. This pack should include:
- Your MCS certificate
- A commissioning certificate
- Product details
- Applicable workmanship warranties
Keep these documents in a safe place, as you may need the MCS certificate if you decide to sell your property or update its Energy Performance Certificate (EPC).
Lastly, when making your payment, limit your deposit to no more than 25% of the total cost, and ensure it’s protected by insurance.
Reviewing Local Experience and Installation Quality
Once you’ve confirmed your installer’s certifications and compliance, the next step is to dig into their hands-on experience and work quality. A provider’s track record, especially in your local area, can have a major impact on how well your system performs and how long it lasts. Their attention to detail during the survey and design phases is equally vital.
Checking the Provider’s Installation History
Start by asking about their local experience – how long they’ve been operating in your area and how many installations they’ve completed. Request references or case studies from previous customers nearby. These can give you a clear picture of the quality of their work and what you can expect from their service.
It’s also important to know who will be installing your system. Does the company use its own in-house team, or do they rely on subcontractors? In-house teams often provide more consistent quality and accountability. If subcontractors are involved, ask how they are vetted to ensure they meet high standards. Once you’ve gathered this information, confirm their claims with a detailed technical survey of your property.
Getting a Thorough Site Survey
A detailed site survey is essential and should never be skipped. Make sure the survey is conducted by a qualified surveyor, not a salesperson. Avoid signing any contracts based solely on a sales pitch. A proper survey should include measurements of your roof’s tilt, checks on its structural integrity, and an evaluation of potential shading risks throughout the year.
"A good surveyor should do a technical site survey including looking at roof orientation, measuring roof tilt, assessing roof quality (inside and out), recording any risks of shade on the panels (taking into account how this will change over time and at different times of the day and year), looking at your consumer unit and metering, asking about your electricity use (and when you use it), and discussing where to locate cables and equipment." – Which?
The surveyor should also examine your existing consumer unit and metering to ensure they are compatible with a solar PV system. They should discuss your electricity usage patterns, including when you use the most energy, to design a system that meets your needs. After the survey, review the technical design proposal carefully to ensure it’s tailored for optimal performance.
Examining System Design and Installation Standards
Once the survey is complete, take a close look at the proposed system design. Pay attention to the choice of inverter and battery storage, ensuring they match your energy needs and installation conditions. For instance, avoid placing the inverter in a loft if heat could affect its efficiency.
Check that the quote includes an export meter, which allows you to receive payments for any electricity you send back to the grid. In Northern Ireland, a standard residential installation usually takes about four hours, though more complex setups can take one to two days. Additionally, confirm that the installer will handle the required registration with your local Distribution Network Operator (DNO) within 28 days.
Finally, ensure the installer uses the government-recommended SAP method to estimate your system’s performance and financial return. This step is crucial for understanding the long-term benefits of your solar PV system.
sbb-itb-d2d975a
Comparing Quotes, Pricing, and Warranties
Once you’ve pinpointed your solar energy needs and checked the credentials of potential installers, the next step is to dive into quotes, pricing, and warranties. This is where you can ensure you’re getting value for money without compromising on quality. Be cautious – choosing the cheapest option might save you upfront but could lead to higher costs down the line if quality or warranties are lacking.
Reading a Solar Installation Quote
A proper solar installation quote should break down all the details. Expect to see an itemised list of components, including the model of solar panels, the type of inverter, and any battery storage. It should also provide an estimate of the system’s annual energy generation in kWh and your self-consumption rate – how much of that electricity you’ll use versus what you’ll export back to the grid.
Labour costs should be clearly separated, covering everything from scaffolding and mounting brackets to electrical connections and system commissioning. Look for additional services in the quote, such as project management, safe disposal of old equipment, and registration with NIE Networks, Northern Ireland’s Distribution Network Operator. It’s also essential to confirm the electricity price used to calculate your projected savings and check whether the installer has factored in shading or the orientation of your roof.
"A quotation for solar PV must follow standards and guidelines from MCS and RECC. It should include an estimate for the annual solar PV generation and an estimate of the level of self-consumption of solar PV at the property." – NEA
In Northern Ireland, residential solar systems typically range from £5,000 to £10,000, depending on size and complexity. For instance, a 4.5kW system with 10 panels might cost about £3,950, while a larger 9kW system with 20 panels could be around £5,900.
Once you’re satisfied with the quote’s details, it’s time to look at the warranties offered.
Checking Product and Installation Warranties
Warranties are a key part of protecting your solar investment. Solar panels generally come with two types of warranties: a product warranty (covering defects) lasting 10 to 25 years, and a power warranty, which typically guarantees at least 80% output by year 25. The annual degradation rate for most panels is around 0.7%.
Inverters and batteries usually have shorter warranties, ranging from 5 to 12 years. Additionally, check if the installer provides a workmanship warranty, which covers the quality of the installation and typically lasts 5 to 10 years. However, be aware that many manufacturer warranties only cover replacement parts – labour costs for uninstalling and reinstalling equipment or shipping fees are often excluded.
To maximise your investment, ensure your installer is MCS-accredited and a member of RECC, as this is often required to qualify for Smart Export Guarantee (SEG) payments. Also, confirm whether the warranty is transferable if you sell your property, as this can help maintain its resale value.
With warranties understood, you can then assess the system’s long-term value.
Calculating Long-Term Value
Price is just one part of the equation. To gauge overall value, consider the payback period and ongoing expenses like maintenance and potential upgrades. In Northern Ireland, most residential solar systems pay for themselves within 7 to 12 years. For example, a 3.5kW system costing roughly £4,800 could save you £563–£663 annually through reduced electricity bills and export payments. With the current export rate at 17.6p per kWh, you can also earn money for surplus electricity sent back to the grid.
It’s worth asking whether your quote includes a monitoring platform to track your system’s performance in real time. Also, check if the installer provides after-sales support or recommends maintenance schedules. While premium systems may cost more upfront, their higher-quality components and longer warranties often lead to better long-term savings by reducing replacement costs and maintaining efficiency.
"Don’t compare installers on cost alone – the cheapest may not be the most appropriate." – Energy Saving Trust
To further compare quotes, calculate the cost per watt. This metric helps you determine whether you’re getting good value, regardless of the total system size or capacity.
Reading Customer Reviews and Checking Aftercare Services
Once you’ve completed your technical and compliance evaluations, it’s time to consider customer feedback and aftercare services. These aspects provide practical insights into a provider’s reliability and ensure your solar system performs well over the long term. Real customer experiences and robust support can offer peace of mind as you move forward with your investment.
Reading Customer Reviews and Testimonials
Customer reviews can reveal a lot about a provider’s professionalism and service quality. Look for feedback that highlights whether the company’s representatives were punctual, courteous, and properly identified themselves. Be cautious of reviews mentioning high-pressure sales tactics, such as limited-time discounts for signing a contract on the spot. Trustworthy providers give you the time and space to make informed decisions.
"Do not sign a contract with a company whose representative… offers you a discount for signing the contract that day." – RECC
It’s also worth noting if customers mention the provider’s membership in the Renewable Energy Consumer Code (RECC), which offers dispute resolution services if issues arise. Additionally, local installers often receive praise for their ability to respond quickly to warranty or installation concerns. These reviews can help you gauge the level of after-sales support you might expect.
Checking After-Sales Support and Maintenance Options
Good aftercare is essential for keeping your solar system running smoothly. Find out if the provider includes maintenance tasks – like cleaning panels and inspecting components – as part of their package or if these services require a separate agreement. It’s also important to ask whether repairs are handled by the provider’s own team or outsourced, as this can influence how quickly issues are resolved.
A monitoring platform is another valuable feature, offering real-time tracking of your system’s performance. These platforms can alert you to drops in efficiency or faults, helping you address problems early and maximise your system’s output. Reliable aftercare ensures your system remains efficient and ready to meet your energy needs as they evolve.
Asking About Future Upgrades and Expansions
Your energy requirements may change over time – whether you’re working from home more, adding an electric vehicle, or expanding your household. It’s important to check if your solar system can be upgraded to meet these evolving needs. Choosing a provider that supports future expansions can save you from costly reinstallations down the line.
Ask if the inverter has enough capacity to accommodate additional panels later, as this can prevent the need for replacement during an upgrade. Similarly, confirm whether the system is “battery-ready” if you’re considering energy storage in the future. Modular components, like microinverters or power optimisers, make it easier to expand your system without requiring a complete overhaul. Even if you’re not planning a full installation now, having the provider assess your roof’s total usable space can help you understand your options for future growth.
"The decision to opt for an expandable solar system is a decision to invest in a future where your home’s energy system is adaptable, efficient, and technologically advanced." – SolarEdge
Conclusion
We’ve covered the essential steps to help you choose the right solar provider, so let’s recap the key points.
Start by assessing your energy requirements and ensuring your property is suitable for solar installation. Make sure any provider you’re considering holds MCS accreditation and is a member of the Renewable Energy Consumer Code (RECC). These credentials not only ensure regulatory compliance but also make you eligible for export tariffs.
Get at least three quotes and carefully compare them. Look at system design, the quality of components, pricing, and the warranties offered. Some solar panels now come with warranties of up to 30 years. Also, confirm that these warranties cover both the products and the installation. Don’t forget to check that your installer will register your system with Northern Ireland Electricity (NIE) Networks under the EREC G98/NI standard. Beyond costs and warranties, ongoing support is crucial for a solid investment.
Local expertise matters too, especially for aftercare and service. Be cautious of high-pressure sales tactics, especially those offering one-time discounts requiring immediate decisions.
Solar systems typically cost between £5,000 and £10,000, with a payback period of about 7–12 years. Households in Northern Ireland can save £310 to £495 annually on electricity bills. By thoroughly evaluating your energy needs, checking installer credentials, and understanding aftercare options, you can make an informed choice and enjoy the long-term benefits of solar energy.
FAQs
How can I choose the right size solar system for my home?
To figure out the right size solar PV system for your home, start by checking your annual electricity usage. You can find this information on your energy bills. In Northern Ireland, the average household uses about 4,500–5,500 kWh of electricity each year. Next, take a look at your roof space. Solar panels perform best on roofs that face south or south-west and have minimal shading. You’ll need around 6–8 m² of roof area for every 1 kW of installed capacity.
For example, a standard 4 kW system, which usually consists of 10–12 panels, can generate roughly 3,400–4,200 kWh per year in Northern Ireland. To estimate the system size you’ll need, divide the amount of electricity you’d like the system to generate (for instance, 60–80% of your annual usage) by the average output per kW in this region, which is about 850 kWh per kW. Make sure your roof has enough space to fit the required number of panels.
It’s also worth thinking about your future energy requirements. If you’re planning to charge an electric vehicle or make other home upgrades, factor these into your calculations. By balancing your energy needs, available roof space, and budget, you can choose a system that works best for your home.
What certifications should a solar installer have in Northern Ireland?
When choosing a solar installer in Northern Ireland, it’s essential to check if they’re certified under the Microgeneration Certification Scheme (MCS). This UK-recognised certification ensures the installer adheres to strict standards for system design, installation, and after-sales service. With MCS certification, you can feel confident in the quality, performance, and reliability of your solar system.
It’s also worth checking if the installer is a member of the Renewable Energy Consumer Code (RECC). RECC membership means the company follows a code of practice that guarantees transparent pricing, clear warranties, and fair dispute resolution. Always ask for proof of both MCS certification and RECC membership before committing to any work. These credentials are a strong indicator of a professional and reliable provider who can deliver top-notch results.
How can I make sure my solar system meets my future energy needs?
To make sure your solar system meets your energy needs now and in the future, begin by assessing how much electricity you currently use. Think about any changes that might increase your consumption, like adding an electric vehicle or new appliances. Opt for a photovoltaic (PV) system with room to grow – one that can handle these potential increases and be expanded if necessary.
Equally important is partnering with an MCS-accredited installer who offers a solid warranty. This guarantees your system stays dependable and efficient as your energy requirements change over time.