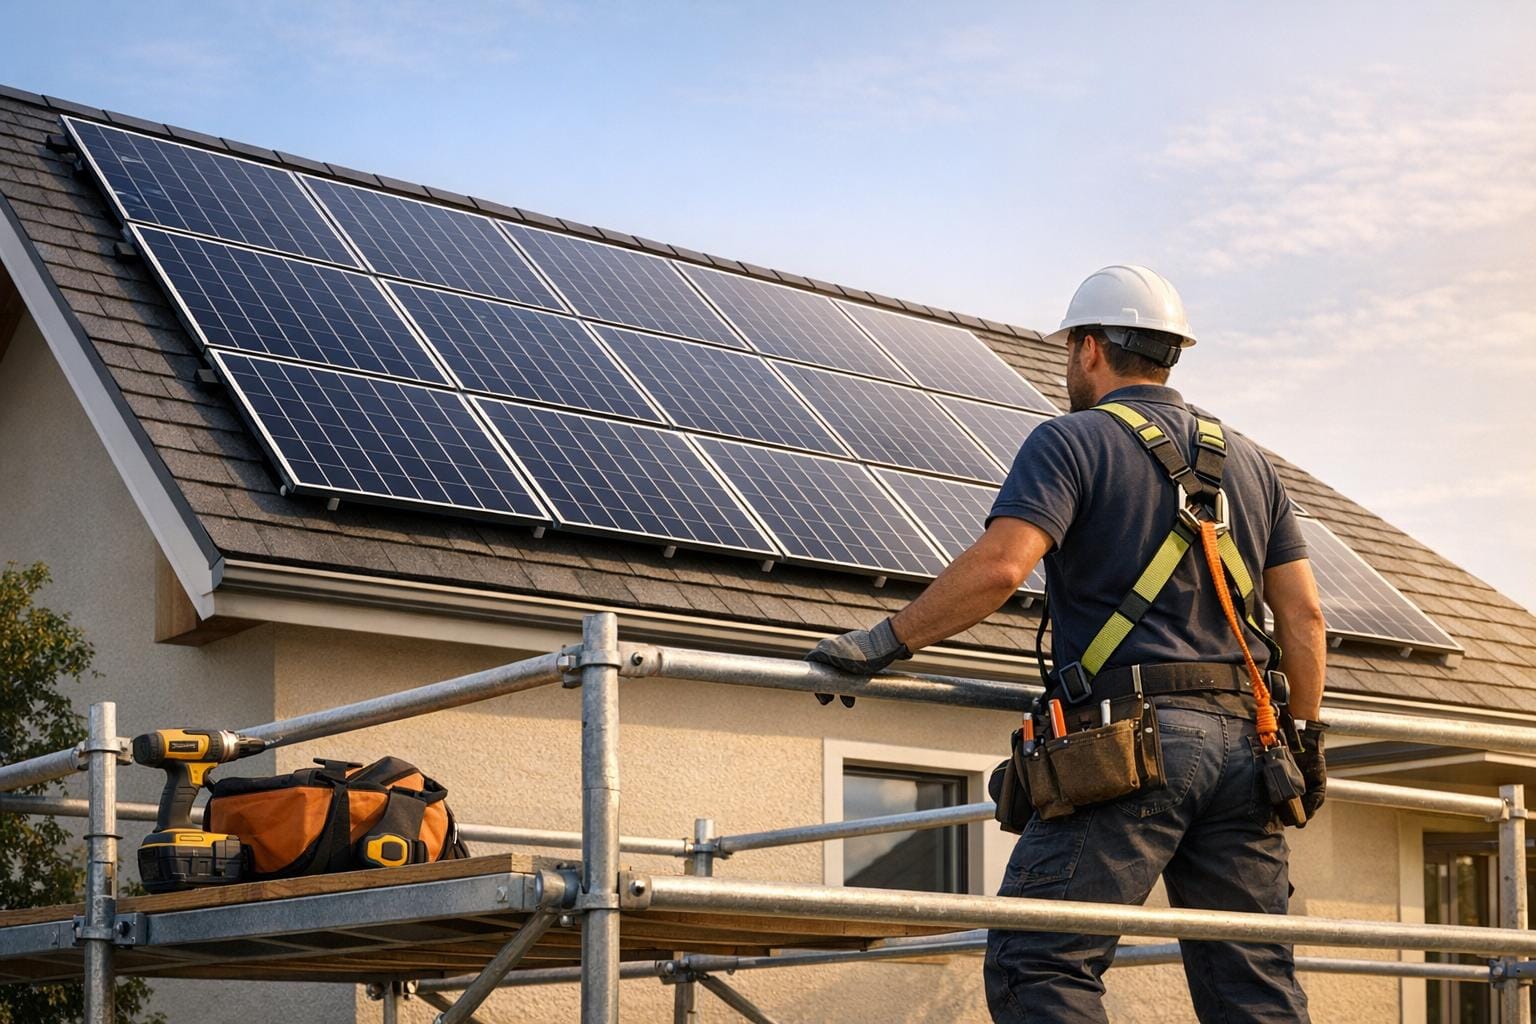
Installing solar panels can strain your roof, leading to damage if not handled correctly. Key steps to protect your roof include thorough pre-installation checks, using certified installers, and taking precautions during installation. Here’s what you need to know:
- Pre-Installation Checks: Get a professional roof survey to assess structural strength, identify weak spots, and ensure your roof’s angle and direction are suitable for solar panels.
- Certified Installers: Choose MCS-certified professionals who follow industry standards and prioritise safety, including proper scaffolding and protective measures for fragile roof elements.
- On-Site Protection: Use scaffolding, temporary covers, and weight-distribution tools to minimise damage. Avoid standing on fragile materials like skylights and ensure safe working distances.
- Post-Installation Inspections: Check for leaks, displaced tiles, or other damage. Confirm proper documentation like MCS certificates and compliance with building regulations.
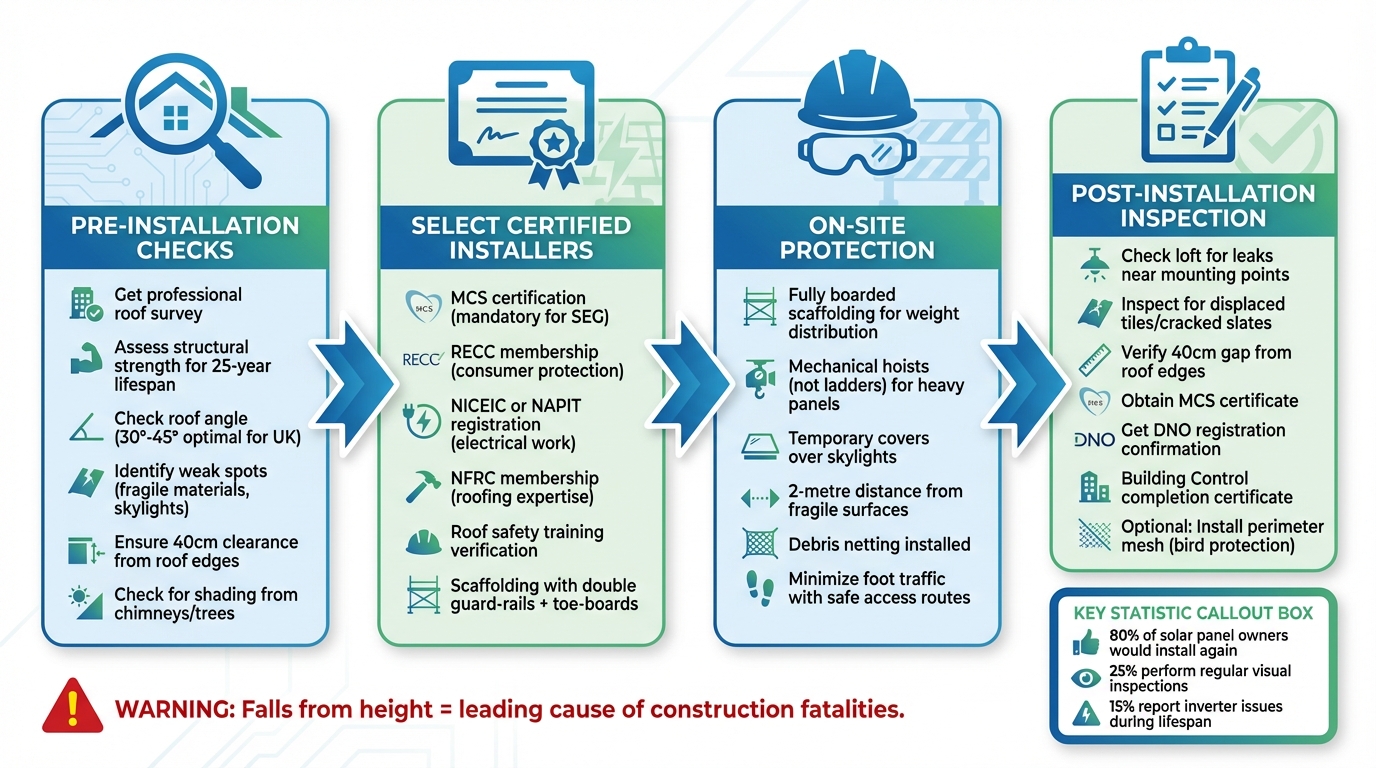
4-Stage Solar Panel Roof Protection Process: Pre-Installation to Post-Installation Checklist
Checking Your Roof Before Installation
Before installing solar panels, it’s essential to evaluate your roof’s ability to handle the added weight and equipment. This means identifying any structural weaknesses, fragile materials, or potential placement challenges.
Getting a Professional Roof Survey
Start with a thorough inspection by a qualified surveyor. They should physically check your loft space, as mounting brackets need to be securely fixed to rafters. Any pre-existing damage in this area could lead to shifting or detachment of the panels later on. The surveyor will assess if your roof can support not only the weight of the panels but also the equipment and workers required for installation.
In addition to the structural evaluation, technical surveys focus on your home’s electrical system. This includes examining fuse boxes and cable routes to ensure they can handle the demands of a solar setup. The surveyor will also check for internal hazards like exposed wires, asbestos, or signs of vermin infestations. Avoid signing any contracts based solely on a salesperson’s visit – a full technical survey is crucial. This survey should cover roof tilt, orientation, and structural integrity.
Once the survey is complete, you can move on to identifying any weak points in your roof.
Finding Weak Points in Your Roof
Certain roofing materials aren’t suitable for supporting solar panels. Fragile elements like fibre cement sheets, skylights, or older glazing fall into this category. Workers should steer clear of operating within two metres of these areas. A good surveyor will clearly mark these zones to avoid accidents during the installation process.
You should also consider the overall condition of your roof. Older roofs may have brittle tiles or weakened structures that can’t handle the stress of supporting solar panels for their 25-year lifespan. Even minor issues, such as damp patches or loose ridge tiles, can worsen under the added weight. Addressing these problems before installation is far more cost-effective than having to remove the panels later for repairs.
Once you’ve dealt with structural concerns, ensure your roof’s direction and angle are optimised for solar efficiency.
Checking Roof Direction and Angle
Survey results will guide the best placement of your panels based on your roof’s orientation and pitch. Orientation plays a key role in energy generation. South-facing roofs capture the most sunlight throughout the day, while east-facing panels perform better in the morning, and west-facing ones excel in the late afternoon and evening. If your household’s energy use peaks at certain times, aligning your roof’s orientation with your consumption patterns can improve your overall savings.
Most UK roofs, typically angled between 30° and 45°, are well-suited for solar panels. However, it’s important that the surveyor measures the exact pitch, as even slight variations can impact efficiency. Shading can often have a greater effect on performance than orientation. The survey should account for shadows cast by chimneys, walls, or nearby trees throughout the day and across seasons. Don’t forget to consider how future tree growth might affect shading – a small sapling now could block sunlight in a decade.
Finally, the surveyor needs to ensure that panels are installed at least 40 centimetres from the roof edge to minimise wind lift and protect ridge tiles. For pitched roofs, panels must not project more than 200 millimetres from the roof slope to comply with permitted development regulations.
Selecting Certified and Experienced Installers
Once you’ve assessed your roof’s condition, the next crucial step is to find an installer with the right credentials and safety standards to protect your investment. Choosing the right professional is key to ensuring your roof remains in good shape during the solar panel installation process.
Checking for MCS Accreditation and Certifications
An installer with MCS certification guarantees both product quality and installation expertise, adhering to standards recognised across the industry. As MCS explains:
MCS certification ensures that our installers install renewable technologies to the best possible quality, while also adhering to industry-recognised safety practices when working in and around your home.
In addition to MCS, look for membership in the Renewable Energy Consumer Code (RECC). This offers you protection against unethical behaviour, like high-pressure sales tactics. For electrical work, check that the installer is registered with either NICEIC or NAPIT, confirming they have the qualifications to safely connect your system to your home’s grid. If you’re particularly concerned about roof integrity, ensure they are members of the National Federation of Roofing Contractors (NFRC).
To verify an installer’s credentials, use the "Find an Installer" tool on the MCS website. Check their certification status at key points: when you get a quote, before signing a contract, and just before the installation begins. This step is vital, as using an MCS-certified installer is often required to access export tariffs like the Smart Export Guarantee (SEG).
Confirming Roof Safety Training
Falls from height remain one of the leading causes of fatalities in construction. It’s essential to ensure your installer has planned for proper safety measures, especially scaffolding, which is mandatory for solar installations. These projects are not considered short-duration work. The Health and Safety Executive for Northern Ireland emphasises:
Roof work must be properly planned and appropriate safety equipment and training provided. The risks are substantial, however long or short the work.
Ask your installer to provide a list of subcontractors involved and confirm their training and qualifications. Make sure trained scaffolders will handle the erection, alteration, and dismantling of scaffolding, with weekly inspections in place. Scaffolding should include double guard-rails and toe-boards, extending at least two metres beyond the work area on both sides.
Additionally, check how the installer plans to protect fragile roof elements like skylights or fibre cement sheets. Workers should never stand directly on these materials without proper barriers or covers, and they should maintain a two-metre distance from these areas whenever possible. These precautions ensure your roof is safeguarded during the installation process, setting the stage for a smooth and secure project.
Protecting Your Roof During Installation
Once the scaffolding is in place, your installer should take specific steps to shield your roof from potential damage. These temporary measures are crucial in ensuring your roof remains intact during the installation process, bridging the gap between initial planning and on-site work.
Temporary Covers and Scaffolding
Using fully boarded scaffolding is essential to evenly distribute weight and minimise stress on your roof. Make sure the scaffolding is equipped with proper edge protection for safety. Additionally, debris netting should be installed to catch any materials that might be dropped during the work.
Heavy panels should be lifted to roof level using mechanical hoists or forklifts instead of being carried up ladders. This approach reduces the risk of accidental drops that could damage the roof surface. For pitched roofs, using bridging ladders or staging can create a "free span" over the roof, allowing workers to reach the installation site without standing directly on fragile tiles or slates.
Securing Fragile Roof Features
It’s not just the general roof area that needs protection – vulnerable features like skylights, chimneys, and vents also require attention. Skylights, for example, cannot bear significant weight, so secure covers or barriers should be installed over these areas. Safety nets can also be placed under larger fragile sections to provide added security. Workers should avoid standing on or working within two metres of unprotected fragile surfaces unless proper barriers are in place.
For chimneys, vents, and similar features, the solar array design should account for these structures, ensuring they remain functional and don’t obstruct water drainage. If your roof includes fibre cement sheets or similar materials, workers should use staging or crawling boards to spread their weight evenly, reducing the risk of cracks or other structural damage.
Minimising Foot Traffic and Roof Stress
Excessive foot traffic can place undue stress on specific parts of your roof. To prevent this, your installer should establish safe access routes using staging to distribute weight more evenly. For tasks involving attic spaces, expandable safety platforms provide a secure walkway, helping to avoid accidents like falling through the ceiling.
When positioning panels, it’s important to follow proper spacing guidelines to minimise wind-related risks. Additionally, work should be paused during adverse weather conditions to ensure safety and prevent unnecessary strain on your roof.
sbb-itb-d2d975a
Checking Your Roof After Installation
After your solar panels are installed, it’s crucial to carry out a final inspection to ensure everything is in top condition. A detailed check can confirm that all protective measures are working as intended and your roof remains intact.
Inspecting Your Roof and Structure
Start by inspecting your loft or attic, focusing on the areas near the mounting points. Look for any signs of moisture, leaks, or damage. From a safe position outside, visually examine the roof for any displaced tiles, cracked slates, or debris.
"Access to the underside of the structure should be provided to allow regular inspection, after installation." – Historic England
Check that there’s at least a 40cm gap between the panels and the roof edges, such as the ridge, eaves, or gables. This spacing helps minimise wind uplift and reduces noise. If your roof is tiled, ensure the tiles have been notched correctly to lie flat. For slate roofs, confirm that proprietary clamps or lead flashings were used instead of drilling through the slates. Spotting any leaks or damage? Contact your installer immediately – professionals should have sealed all roof penetrations to prevent moisture from seeping in.
Interestingly, about 25% of solar panel owners regularly perform visual inspections for dirt, debris, or damage. This simple habit can help keep your system running smoothly.
Getting Building Control Completion Certificates
To ensure your installation complies with UK building standards and qualifies for benefits like the Smart Export Guarantee (SEG), you’ll need the proper documentation. Your installer should provide you with an MCS (Microgeneration Certification Scheme) certificate. This government-backed certification confirms the system was installed to high standards.
Additionally, your installer must register your solar system with the District Network Operator (DNO). This step ensures the local grid can safely manage the extra electricity your panels generate.
"The installer will also register your solar panel system (and any battery storage) with your District Network Operator (DNO). This is important to make sure the grid can handle the extra electricity that’s being generated." – Jamie Gibbs, Consumer Content Manager, Energy Saving Trust
If your installer is part of a Competent Person Scheme, they can self-certify that the work meets building regulations, making it easier for you to get the necessary compliance documents. If not, you’ll need to contact your local building control authority to obtain a completion certificate confirming the roof structure is safe and compliant. Don’t forget to keep your MCS certificate handy – it’s essential for registering for export tariffs.
Optional Upgrades for Long-Term Protection
To keep your system running efficiently over time, consider installing a perimeter mesh. This can help prevent birds from nesting and stop debris from building up. Ask your installer for written maintenance guidelines and use system monitoring tools to ensure your panels are performing consistently. Keep an eye on your inverter too – about 15% of solar panel owners report issues with it during the system’s lifespan. Regular checks can help you catch problems early and maintain optimal performance.
Conclusion: Protecting Your Roof During Solar Installation
Taking steps to protect your roof during a solar panel installation is key to preserving your home’s structure for years to come. This involves careful preparation, working with certified professionals, and conducting thorough post-installation inspections.
Start with a detailed pre-installation survey to ensure your roof is up to the task. This technical check will confirm whether your roof can handle the weight of the panels and ensure a 40cm clearance from the edges for safety and stability.
Selecting an MCS-certified installer is equally important. These professionals are trained in proper mounting techniques, use appropriate scaffolding with edge protection, and take care to safeguard delicate roof features during the installation process .
Finally, once the installation is complete, inspect your roof for any issues such as displaced tiles, blocked gutters, or other potential damage. With 80% of solar panel owners saying they would install panels again if they moved, it’s clear that getting it right the first time is worth the effort. Protecting your roof ensures your solar panels perform efficiently across their 25-year lifespan, keeping your home safe, secure, and energy-efficient.
FAQs
What should I check before installing solar panels on my roof?
Before moving forward with solar panel installation, take a moment to evaluate your roof’s condition and its ability to handle the weight of the panels and equipment. Consider the age of your roof, the materials used, and any delicate features like skylights or glazing that might require extra care. Also, check if the roof’s pitch and orientation are ideal for capturing sunlight efficiently, while ensuring there’s little to no shading from nearby trees, chimneys, or other structures.
Don’t overlook potential safety concerns, such as overhead power lines, and make sure there’s safe and secure access for the installation process, including reliable fall-protection measures. To cover all bases, a professional roof survey is highly recommended. This can help pinpoint any issues and confirm that your roof is fully prepared for a hassle-free solar panel installation.
Why should I choose an MCS-certified installer for my solar panel installation?
Choosing an MCS-certified installer guarantees that your solar panel installation aligns with the UK’s established standards for safety, quality, and regulatory compliance. These experts are trained to ensure your roof remains structurally sound while following all necessary guidelines.
On top of that, opting for an MCS-certified installer is often essential if you want to access government-supported financial schemes, like grants or feed-in tariffs. This not only provides reassurance about your installation but also helps you get the most out of your solar investment.
How can I protect my roof during and after solar panel installation?
To protect your roof when installing solar panels, start by selecting an MCS-accredited installer with a solid track record. A reliable installer will carry out a detailed structural assessment to evaluate your roof’s load capacity and spot any existing damage. This step ensures your roof is capable of supporting the panels securely and safely.
The installation process itself requires careful attention to mounting methods. Techniques like using sealed flashing or bolt-on brackets with watertight sealants are essential to prevent leaks and maintain the roof’s structural soundness. It’s equally important that the installer adheres to recognised safety standards and roofing guidelines to minimise potential risks. By opting for experienced professionals and proven methods, you can harness solar energy while keeping your roof in great condition.