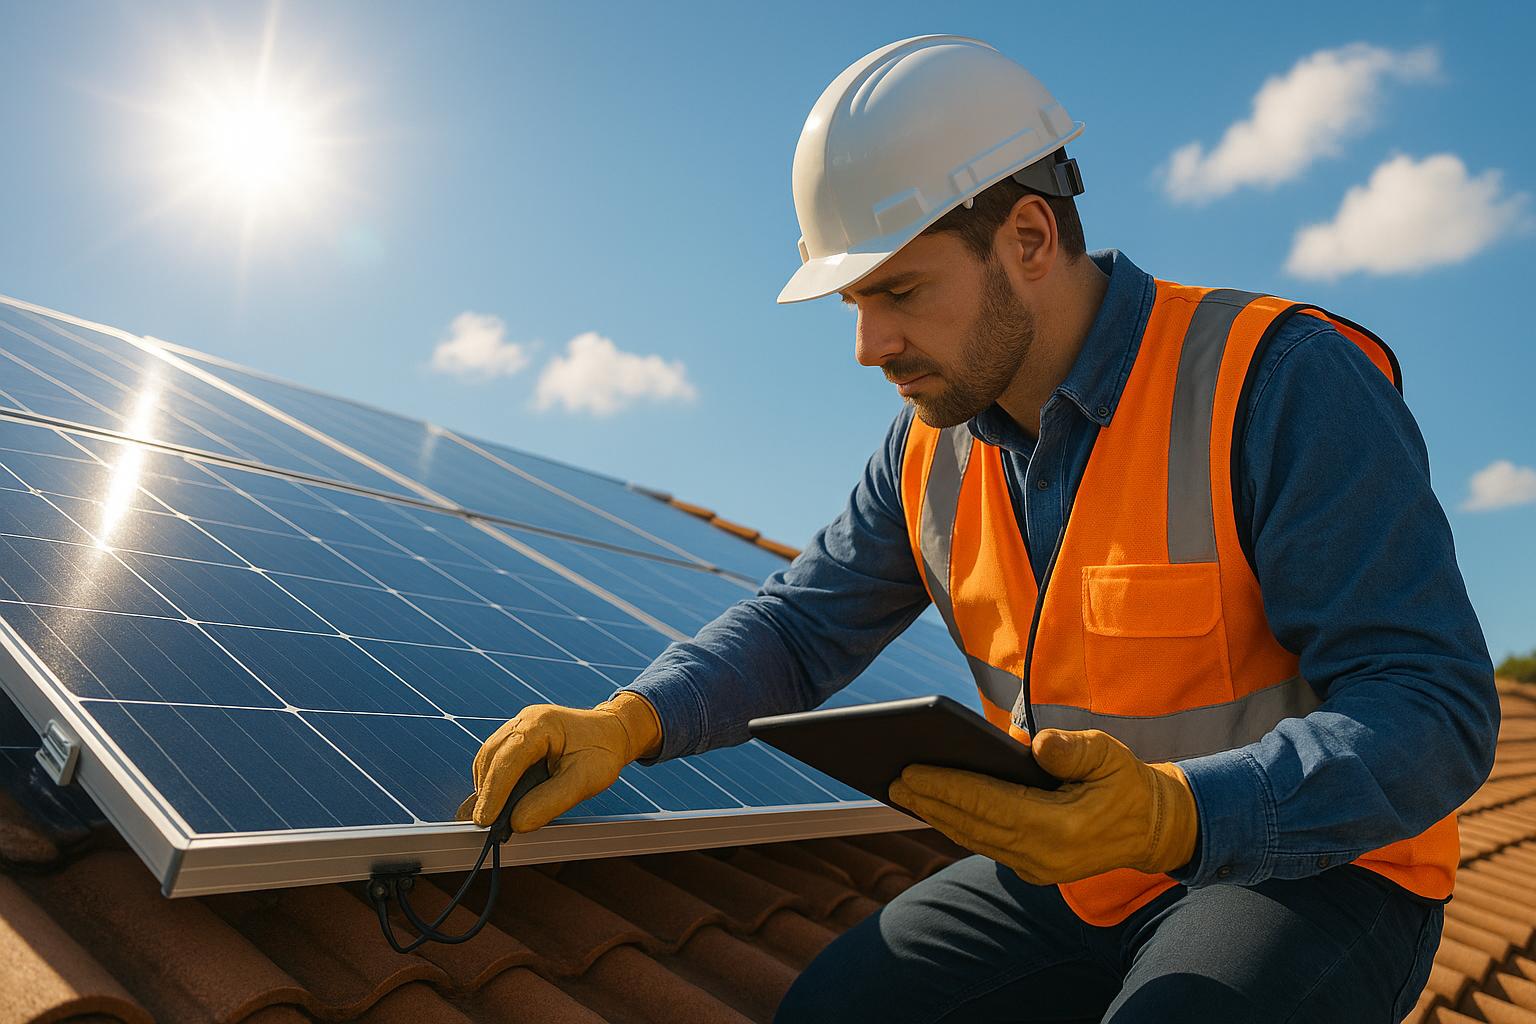
Solar panels are reliable and long-lasting, but they can face problems that reduce efficiency. Common issues include dirt, shading, wiring faults, or inverter errors. In Northern Ireland, harsh weather conditions like rain, wind, and temperature swings make regular inspections important. Here’s how to spot and fix problems:
- Surface Obstructions: Dirt, bird droppings, or leaves can reduce output by up to 30%. Clean panels gently to maintain performance.
- Physical Damage: Cracks, corrosion, or moisture under the glass can harm efficiency. Avoid touching damaged panels and contact a professional.
- Shading: Overgrown trees, chimneys, or new structures can block sunlight. Trim trees or reposition panels if needed.
- Wiring Problems: Loose or corroded connections can cause power loss or safety risks. Inspect cables and junction boxes for wear.
- Inverter Issues: Error codes or low energy output may indicate faults. Reset the inverter or consult a technician if issues persist.
Regular checks and cleaning can prevent costly repairs and extend the lifespan of your system. If problems remain unresolved, professional help ensures safe and effective solutions.
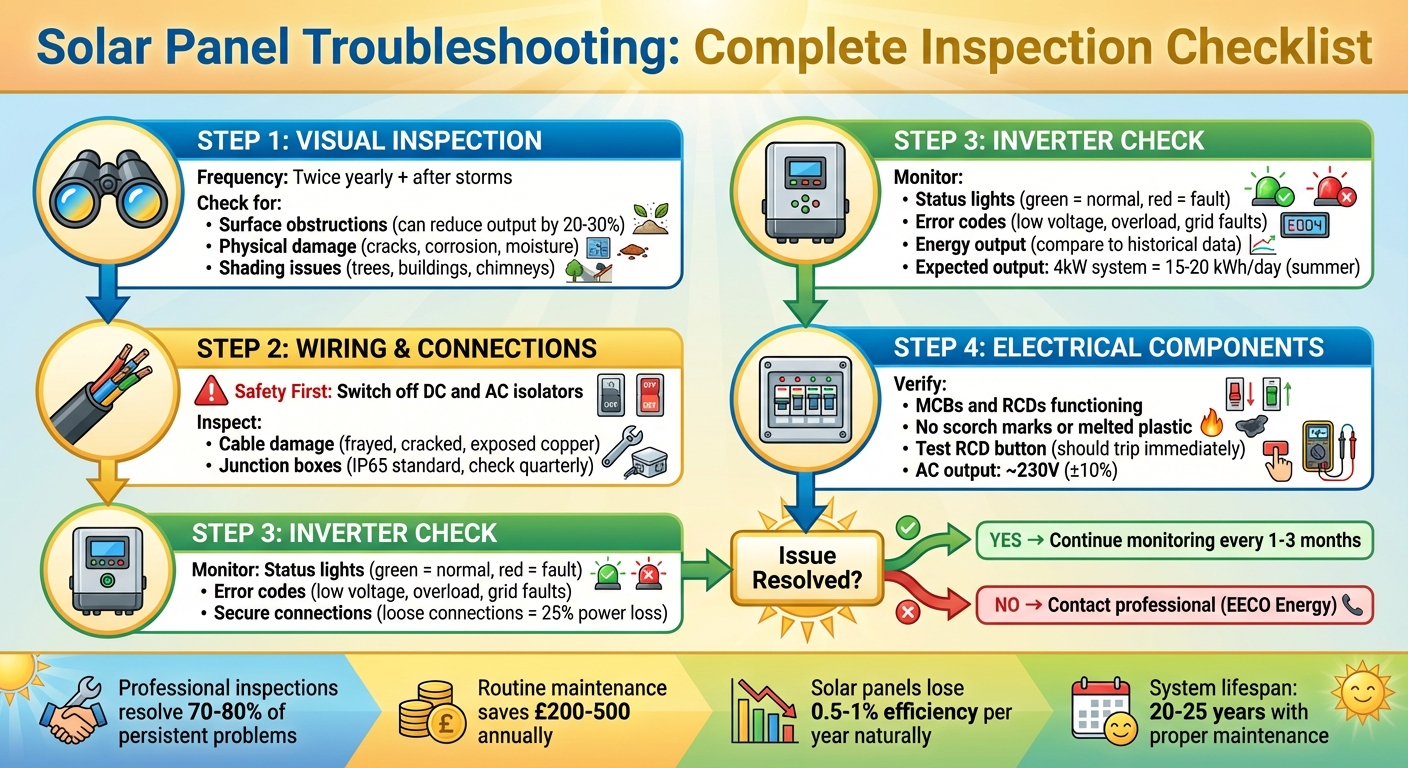
Solar Panel Troubleshooting Checklist: Step-by-Step Inspection Guide
Visual Inspection Checklist
Start with a ground-level check using binoculars to identify any obstructions or damage. This should be done twice a year and after any stormy weather. Follow this by inspecting the wiring and electrical components to pinpoint any further issues.
Check for Surface Obstructions
Dirt, bird droppings, leaves, moss, and pollen can all impact your solar panel’s efficiency. Even a light layer of dust or a few droppings can noticeably reduce power output on sunny days. Heavier build-up can cut efficiency by as much as 20–30%. While rain might rinse away loose dust, it won’t remove sticky droppings, pollen, or moss, which tend to accumulate over time.
Look for dull spots, streaks, or debris along the edges of the panels. After storms, check for foreign objects like plastic bags, branches, or packing materials that may have blown onto the array. During winter, see if snow or ice remains on the panels while nearby roofs are clear, as this can completely block sunlight.
If you notice obstructions, clean the panels with soft brushes and water – steer clear of abrasive pads or harsh chemicals that could scratch the surface. For recurring issues like leaves or sap from nearby trees, consider hiring a qualified tree surgeon to trim branches, ensuring compliance with UK tree-preservation laws.
Inspect for Physical Damage
Cracks, scratches, clouding, frame corrosion, or moisture under the glass can all harm a solar panel’s performance. Left unchecked, these issues can escalate. Micro-cracks, caused by hail, thermal cycling, or mechanical stress, are especially tricky – they may start small but can grow over time, creating hot spots or reducing cell efficiency. Even one damaged cell can strain the others, affecting the entire panel.
From a safe distance, check for hairline fractures or shattered glass. Look out for signs like discolouration, yellowing, burn marks, or cloudiness under the glass, which could indicate moisture ingress or hot spots. Inspect the frames for bends, warping, rust, loose clamps, or missing bolts – this is particularly important after heavy snow, strong winds, or roof work.
If you spot damage, avoid touching the panels or wiring. Instead, take clear photos to share with your installer or service provider and arrange for a professional inspection. Walking on the panels can cause further damage, such as micro-cracks, and may void warranties. Similarly, do not handle suspect wiring – document the issue and consult a professional.
Assess Shading Problems
Shading from overgrown trees, nearby buildings, chimneys, aerials, or satellite dishes can significantly reduce your system’s output. In some cases, shading can even cause hot spots to form on individual cells. Partial shading, where only part of a panel is affected, can reduce the performance of the entire string unless your system has optimisers or micro-inverters in place.
Check your panels at different times on clear days to see if shadows from growing trees, new extensions, or roof additions (like TV aerials or flues) are affecting them.
For trees on your property, consider pruning or crown-lifting by a qualified tree surgeon to maximise sunlight exposure. If shading originates from a neighbour’s property or a newly constructed building, consult your installer to see if optimisers or repositioning the panels could help. Keep a record of shading incidents to assist with professional evaluations.
Wiring and Connection Checklist
Once you’ve ruled out surface obstructions and physical damage, it’s time to focus on the wiring and connections. Faulty or damaged wiring is a frequent cause of solar PV systems underperforming – or even failing outright. This can lead to power fluctuations or complete system shutdowns. Common culprits include loose terminal connections, corrosion at connectors, physical damage to cables, or poor-quality fittings. Before starting any inspection, always switch off the system using the isolator switch and DC isolator. Never handle live wires or open electrical enclosures unless you’re qualified to do so. With safety in mind, carefully inspect each component step by step.
Inspect Cables for Damage
From a safe vantage point, trace the cables running from your panels to the roof edge, then to the inverter and consumer unit. Look out for wear and tear, such as frayed, cracked, chewed, or flattened insulation; exposed copper; kinks; or brittle outer sheaths caused by UV exposure. Birds and rodents are known to damage solar wiring, especially by nesting under panels and chewing on insulation. Check under the array for signs like bird nests, droppings, or chew marks – this is particularly important in rural areas or during winter when systems are attic-mounted.
Ensure both DC and AC cables are securely clipped and not rubbing against sharp edges, guttering, or roof tiles. Friction over time can wear through insulation. If you notice burn marks, melted insulation, or detect a strong burning smell, shut down the system immediately and call a professional installer. Minor corrosion, such as green or white buildup on metal parts, can sometimes be cleaned by a qualified electrician using a wire brush and dielectric grease. However, cables with severe corrosion should be replaced. Don’t forget to inspect the junction boxes for similar signs of damage.
Check Junction Boxes
Junction boxes – whether attached to the back of modules or used as combiner boxes – are critical for protecting connections from the elements and preventing electrical failures. Moisture, insects, dust, or loose cable glands can lead to corrosion, ground faults, and reduced energy output. Ensure all visible junction boxes are securely closed with their lids, seals, and cable glands intact. Watch for signs like condensation, rust stains, greenish corrosion, insect nests, or debris around edges or vents. These issues indicate moisture ingress and require professional attention to dry out, reseal, and re-terminate the connections.
In the UK, junction boxes should meet IP65 standards (BS EN 62208) to handle rain and wind. Regular inspections – ideally every quarter or after storms – are key. Outdoor boxes should be mounted upright, away from standing water, with cables entering from below to minimise moisture ingress. If you see water stains, condensation, or corrosion bubbles inside a box, don’t attempt repairs yourself. Instead, contact a qualified installer to address the issue.
Verify Secure Connections
Once you’ve checked the cables, move on to verifying the security of all connections. Inspect visible plug connectors, such as MC4 connectors, between panels and along the DC string. They should be fully inserted with locking clips engaged, leaving no visible gap between the mating halves. At the inverter, confirm that cable entries and strain reliefs (glands) are tight, and ensure that no bare copper is exposed at the terminals. Loose connections can cause significant power loss – potentially reducing efficiency by up to 25% – and may lead to overheating or even fires due to arcing.
Many connection issues can be traced back to the original installation, such as improper torque on terminals or mismatched connector brands. These problems may take years to surface as intermittent faults or hot connections. If your system’s performance drops without visible physical damage, a professional can test continuity, insulation resistance, and connection torque with specialised instruments. Additionally, comparing your current energy output (in kWh per day) with past months using your monitoring app can help identify underperforming strings. This could signal a loose connector, damaged cable, or faulty junction box.
For any suspected electrical issues, contact a qualified installer – such as EECO Energy – for professional diagnostics and repairs, whether it’s tripped breakers, inverter errors, or cable damage.
Inverter and Electrical System Checklist
Once you’ve inspected and confirmed the wiring and connections, it’s time to turn your attention to the inverter and other electrical components. The inverter plays a crucial role in your solar system, converting the DC power generated by your panels into AC electricity for household use. If the inverter malfunctions, your entire system could either underperform or stop working entirely. Common problems include error codes caused by low input voltage, overloads, or grid faults – issues that can be especially common given the UK’s unpredictable weather. Always ensure the system is isolated using both DC and AC isolators before examining any electrical components.
Check Inverter Status
Locate your inverter, which is often installed near your consumer unit or in a garage, and check its display panel or indicator lights. A steady green light typically means everything is functioning normally, while red or flashing lights indicate a fault. Pay attention to any error codes displayed, such as "low input voltage" (which could stem from shading or wiring issues) or "overload" (caused by excessive load on the inverter). Error codes can vary depending on your system’s setup, so refer to your manual for specific guidance. If the inverter has shut down during a power cut, confirm whether the grid is back online – most inverters automatically disconnect during outages for safety and should restart once power is restored.
Many minor faults can be resolved with a simple reset. To do this, turn off the DC isolator first, followed by the AC isolator, wait for five minutes, and then restart in reverse order (AC isolator first, then DC). If the issue persists or the inverter continues to shut down, it may indicate an internal fault that requires professional attention. Never ignore ongoing red lights or unusual buzzing sounds, as these could point to more serious problems.
Once the inverter is back to normal operation or the error is resolved, monitor your system’s energy output to ensure consistent performance.
Monitor Energy Output
Use the inverter’s monitoring app, display, or a dedicated meter to track your system’s real-time energy production, measured in kilowatt-hours (kWh). Compare the current output to historical data from similar sunny days. For example, a 4kW system in the UK might typically produce 15–20 kWh per day during the summer. If you notice your system’s output dropping below 80% of expected levels on clear days (e.g., from a peak of 5kW down to less than 2kW), it could indicate a problem. Many monitoring apps can alert you to sudden dips or irregularities, helping you pinpoint issues like inverter faults, underperforming panel strings, or wiring problems. Ensure the DC input voltage aligns with your system’s specifications (e.g., 36–44V for a 400W panel) and confirm the AC output is approximately 230V (±10%).
Inspect Electrical Components
After verifying the inverter and energy output, examine the electrical components for any hidden faults. Start with the consumer unit, checking devices like Miniature Circuit Breakers (MCBs), Residual Current Devices (RCDs), AC isolators, and trip switches. MCBs protect circuits from overloads, RCDs detect electrical leaks, and isolators allow for safe disconnection. Ensure all switches are in the "on" position and inspect for signs of damage, such as scorch marks, melted plastic, corroded terminals, or loose wires – these could indicate arcing or short circuits.
To test an RCD, press the test button; it should trip immediately. If it doesn’t, or if MCBs trip repeatedly, isolate the system and contact a qualified electrician. To reset a tripped MCB or RCD, first turn off the AC isolator, switch the device to "off", then back to "on", and observe whether it trips again. Persistent tripping usually points to deeper issues like overloads or damaged wiring, which need professional investigation. Never bypass safety devices or repeatedly reset switches without identifying the root cause of the problem.
If any inverter errors remain unresolved, energy production drops, or electrical faults persist, reach out to a qualified installer – such as EECO Energy – for expert diagnostics and repairs.
sbb-itb-d2d975a
When to Contact EECO Energy for Professional Support
After completing basic visual and wiring checks, some issues may persist, such as unexplained drops in energy output. These problems often signal the need for professional diagnostics. For example, inverter faults that don’t resolve after resets, hot spots visible on panels, or energy production dipping on sunny days all require expert attention. More complex issues – like corroded wiring, loose terminals causing power fluctuations, or high system voltage due to design flaws – can pose serious risks, including electrical shorts or even fire hazards. These are not problems to tackle without the right tools and training.
With over 25 years of MCS-accredited experience, EECO Energy offers expert support for homeowners and businesses across Northern Ireland. Their certified technicians manage everything from routine maintenance to emergency repairs, ensuring your solar system operates safely and efficiently all year round.
Here’s when you should consider professional intervention and why expert diagnostics and maintenance matter.
Professional Diagnostics and Repairs
Professional tools like thermal imaging and electrical testing can uncover hidden problems that are easy to miss. EECO Energy uses these advanced techniques to detect issues such as hot spots, micro-cracks, or wiring faults that aren’t visible during a basic inspection. This targeted approach not only restores your system’s full efficiency but can also save you between £200 and £500 annually on energy costs.
Some common repairs include:
- Adjusting over-voltage systems, which are often caused by Northern Ireland’s colder climate or poorly designed string inverters.
- Replacing panels affected by hot spots due to dirt build-up.
- Repairing corroded wiring between panels and inverters.
- Swapping out faulty inverters that fail to produce AC output.
In fact, professional inspections resolve 70–80% of persistent problems, such as recurring inverter errors or shading issues. These repairs can significantly lower electricity bills, offering both peace of mind and financial savings.
Routine Maintenance Services
Regular MCS-accredited maintenance is essential for preventing efficiency losses caused by dirt, shading, and corrosion. It also helps extend the lifespan of your system and ensures your warranty remains valid. Solar panels naturally lose about 0.5–1% efficiency each year, but routine inspections can catch early signs of degradation, keeping your system performing at its best.
EECO Energy’s maintenance services include:
- Ensuring panels remain clean and free from debris, a common issue given Northern Ireland’s frequent rain.
- Addressing shading problems caused by urban structures, trees, or bird nesting.
- Managing voltage increases that occur in colder temperatures.
The company also offers a 25-year warranty on solar panels, guaranteeing 80–90% efficiency after 25 years, along with inverter warranties ranging from 5 to 12 years. To keep these warranties valid, annual MCS-accredited maintenance is required to check for physical damage, shading, or wiring faults.
Conclusion
Carrying out visual checks and monitoring your inverter every 1–3 months – or after severe weather – helps keep your solar system running smoothly and protects your investment, which typically spans 20–25 years. Simple ground-level inspections and tracking your kWh output can highlight potential problems early, saving you from costly repairs and ensuring you generate maximum electricity while relying less on the grid.
Many common problems can be addressed through basic upkeep or a quick visit from a professional. However, if issues persist, it’s essential to consult an expert. Avoid handling inverters, panels, or live DC wiring yourself, as these tasks require specialised skills and equipment.
For homeowners and businesses in Northern Ireland, EECO Energy provides dependable diagnostics, repairs, and routine maintenance services. Scheduling a professional inspection every few years – or sooner if issues arise – ensures detailed electrical tests, thermal imaging to spot hidden faults, and thorough checks of mounting and earthing, all of which go beyond what you can safely do at home. This proactive approach not only upholds your warranty but also prolongs the life of your system and helps keep your electricity costs down.
FAQs
How often should I clean my solar panels to keep them working efficiently?
To ensure your solar panels work at their best, it’s wise to clean them at least twice a year. In the UK, grime, debris, and bird droppings can accumulate over time, which can lower their efficiency.
Keeping them clean doesn’t just help maximise energy output – it can also prolong the life of your solar system. If your panels are easy to access, you can handle the cleaning yourself with water and a soft brush. However, for panels that are trickier to reach, hiring a professional is a safer and more effective option.
How can I tell if my solar inverter isn’t working properly?
If your solar inverter isn’t working properly, you might spot warning lights or see error messages on its display screen. Other tell-tale signs include inconsistent power output or a complete lack of energy production, even on bright, sunny days.
You should also pay attention to the inverter’s fan. If it sounds unusually loud or the unit feels excessively hot, it could signal a problem. Keeping an eye on your inverter’s performance regularly can help you catch these issues early and avoid interruptions in your solar energy system.
How do I know when to call a professional for solar panel maintenance?
If you’re dealing with persistent issues like wiring faults, inverter errors, or a noticeable decline in energy output, it’s a clear sign to bring in a professional. Likewise, any electrical problems that go beyond simple troubleshooting should be left to an expert.
Taking swift action can keep your system running safely and efficiently, preventing further issues or costly damage down the line.