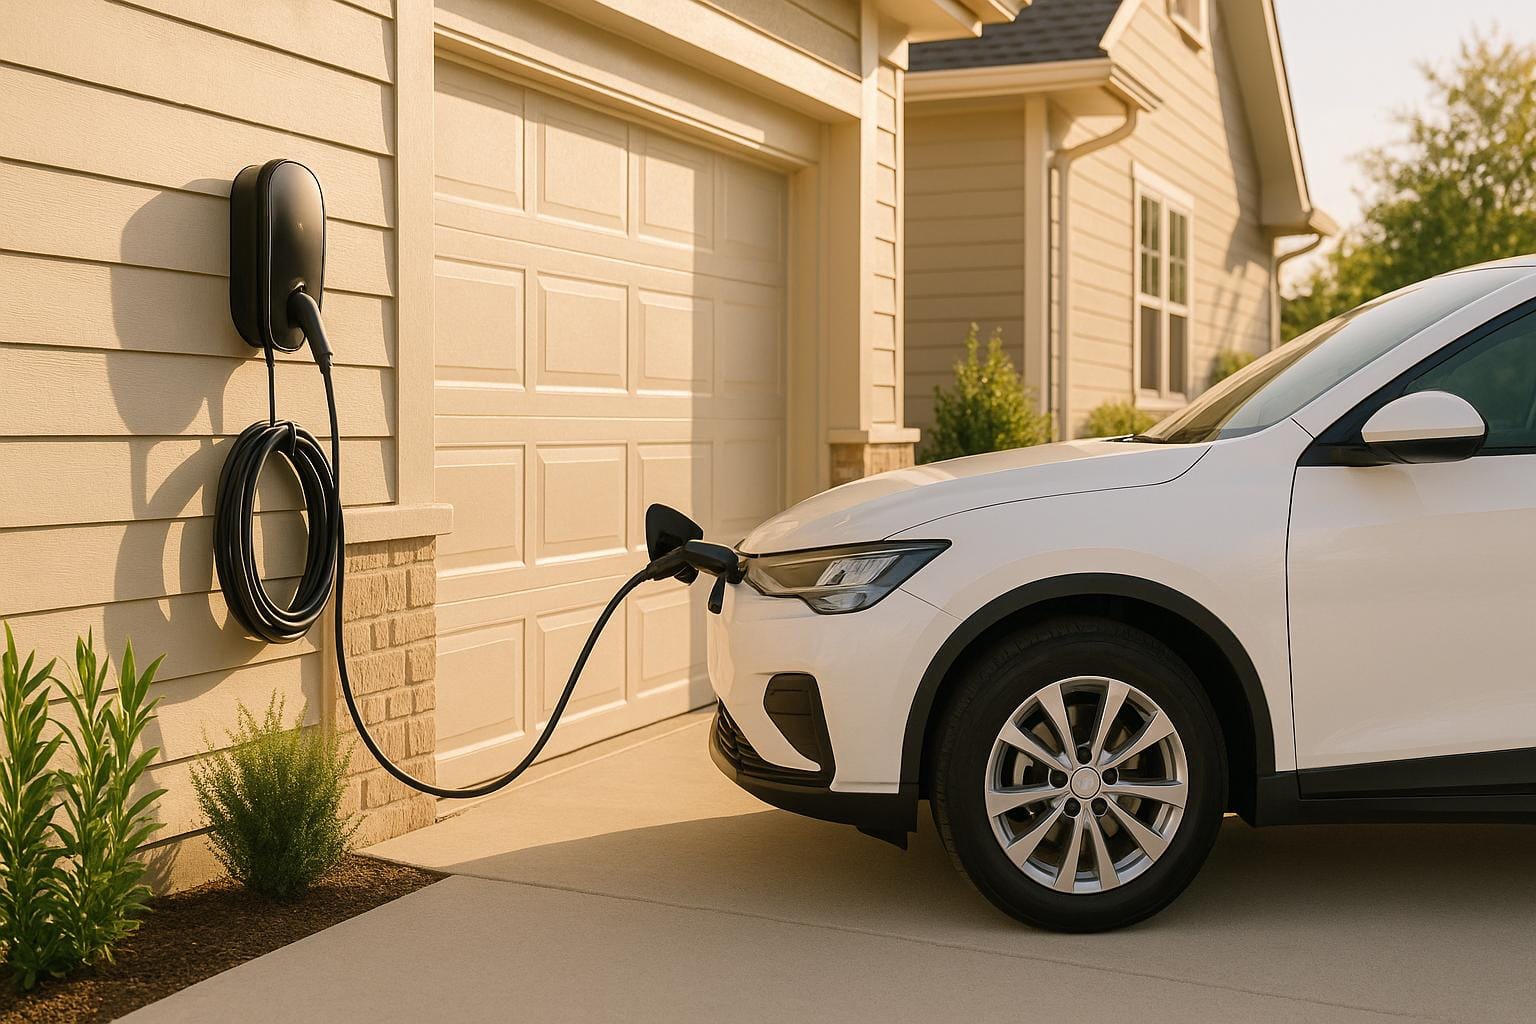
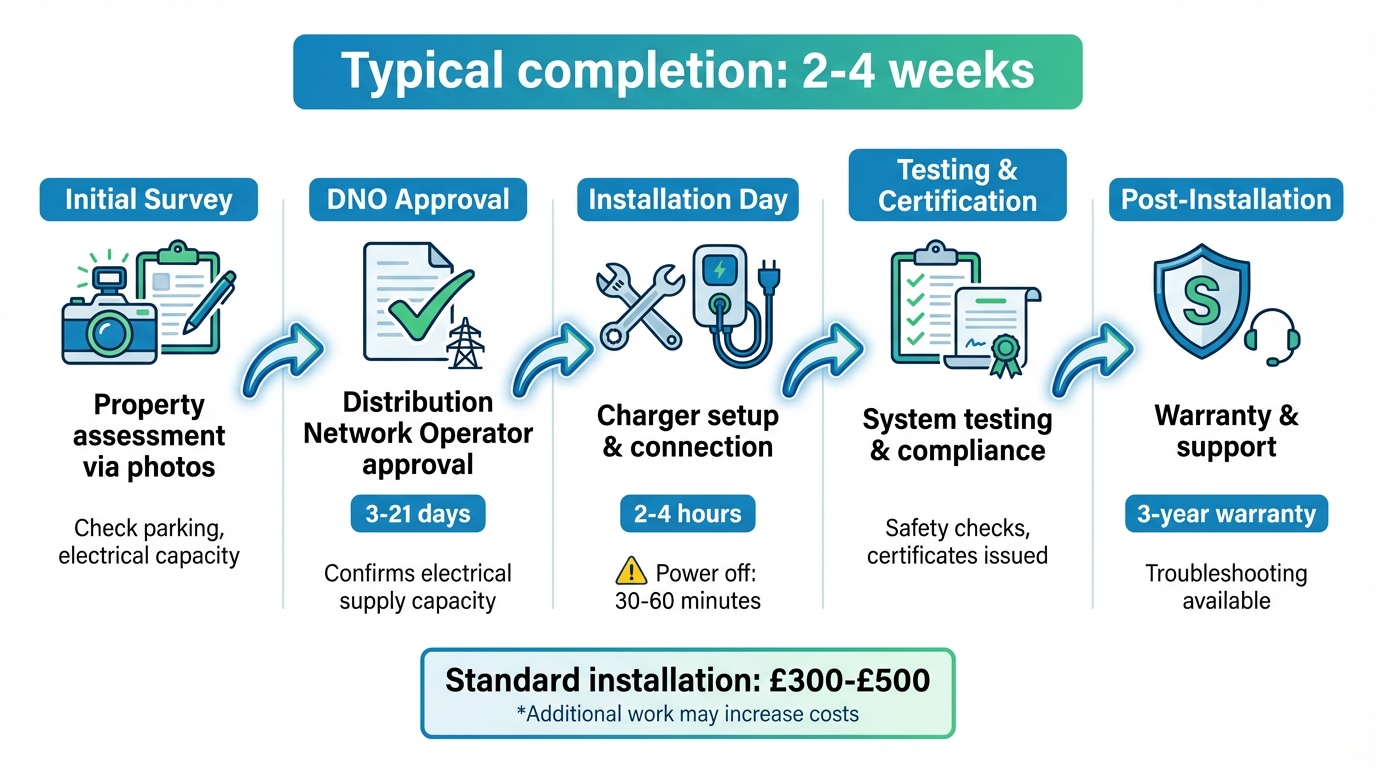
Installing an EV charger at home or work is a straightforward process that typically takes 2–4 weeks. Here’s a quick breakdown of what to expect:
- Initial Survey: Installers assess your property, often through photos, to ensure suitability (e.g., off-street parking, electrical capacity).
- DNO Approval: Your installer will request approval from your local Distribution Network Operator (DNO) to confirm the electricity supply can handle the added load. This step can take 3–21 days.
- Installation Day: The setup typically takes 2–4 hours. Expect power to be off for 30–60 minutes. Installers will mount the charger, connect it to your consumer unit, and test the system.
- Costs: Standard installations range from £300–£500, but additional work (e.g., longer cables or system upgrades) may increase costs.
- Compliance: Only certified professionals can legally install EV chargers in the UK. They’ll handle safety checks, provide certificates, and notify the DNO after installation.
- Post-Installation: Most chargers include a 3-year warranty, with support for troubleshooting and maintenance available.
EV Charger Installation Timeline: From Survey to Completion
Getting Ready for Installation
Property Requirements and Suitability
Before moving forward with an EV charger installation, it’s essential to ensure your property meets the basic requirements. The most important factor? Dedicated off-street parking. Whether it’s a driveway, garage, or private parking space, you’ll need a secure area where the charger can be safely installed and easily accessed. For homes without off-street parking, the process becomes trickier, and relying on public or workplace chargers may be the only viable alternative.
To streamline the process, many installers now conduct virtual surveys. You’ll need to provide clear photos of your electricity meter, fuse box, and the location where you plan to install the charger. These images allow the installer to evaluate your electrical setup, identify any potential issues, and plan the installation without requiring an on-site visit. It’s a faster and more convenient approach for both parties.
Another important consideration is the distance between your consumer unit and the charger location. Standard installation packages usually include up to 10 metres of cabling. If your setup requires more, additional cable or even trenching may be necessary, which can increase costs. Placing the charger further from your house often adds to the overall expense.
DNO Approval and Electrical Capacity
In the UK, your installer must obtain approval from NIE Networks, the Distribution Network Operator (DNO) for Northern Ireland. This step is a legal requirement. The DNO’s role is to ensure the local electricity network can handle the extra load from your EV charger. Most applications are approved within 3 to 10 working days, but more complex cases can take up to 21 days.
If the network can’t immediately support the charger’s full capacity, the DNO might approve a lower-power model – such as a 3.6 kW unit instead of a 7 kW one – until the necessary upgrades are completed. The good news is that your installer handles the entire application process, but it’s worth being aware of this step as it could impact your timeline.
Your home’s electrical system also needs to be assessed. The installer will check your consumer unit to confirm it can safely accommodate the charger. Older homes or those with limited capacity may require upgrades, such as a new consumer unit or a dedicated circuit, especially if you’re opting for a 7 kW charger. Providing detailed photos during the survey can help flag any potential upgrades early in the process.
Once your property and electrical system are cleared, you’re ready to choose the charger that suits your needs.
Selecting Your Charger
Choosing the right charger depends on your driving habits and vehicle. A 3.6 kW charger is ideal for low-mileage users, while a 7 kW charger is more suitable for most households. Smart chargers, though pricier, come with advanced features like app control, scheduling, and energy monitoring. These extras allow you to charge during off-peak hours, helping you save on electricity costs. If you’re considering solar panels or battery storage – such as those offered by EECO Energy – a smart charger can maximise efficiency by prioritising energy generated at home.
Standard installation packages, typically priced between £300 and £500, cover the essentials: the charger itself, 10 metres of cable, wall mounting, and connection to your consumer unit. However, longer cable runs or necessary upgrades will add to the overall cost.
Installation Timeline and What to Expect
What Happens on Installation Day
When installation day arrives, the engineer begins with some essential checks. They’ll verify the mounting point and parking layout to ensure the charger is installed in a safe and accessible location.
Next, the installer will review the planned cable route from your consumer unit to the charger, making sure it avoids any potential hazards. If there are any differences from the pre-installation survey, they’ll explain any additional work or costs before proceeding.
Once everything is agreed upon, the installation begins. This includes securely mounting the charger to the wall, running cables neatly (either through trunking or along the wall), connecting the charger to your consumer unit on a dedicated circuit, and sealing any holes that were drilled. After the wiring is complete, the installer will test the system and get the charger online, connecting it to its companion app. They’ll also walk you through how to use the app. To wrap things up, you’ll receive an installation certificate confirming that the new circuit meets current UK wiring regulations.
With the installation complete, let’s take a closer look at how long the process takes and what’s included.
How Long It Takes and What’s Included
For most homes, a standard installation takes between 2 and 4 hours. The typical package includes the necessary cabling (as identified during your pre-installation survey), which is routed neatly along walls or through basic trunking. It also covers standard drilling, sealing, fixings, and any required regulatory labels.
However, if your installation involves more complex requirements, like longer cable runs, routing through lofts or under floors, or connecting to a detached garage, the process may take longer and cost more. Similarly, tasks such as mounting the charger on a post with trenching, dealing with reinforced walls, or upgrading your consumer unit can add to the timeline and expense. Any additional work or costs will be highlighted during the survey and confirmed on installation day.
What You Need to Do on Installation Day
Preparing the Installation Area
Make sure to clear at least 1 metre of space around the consumer unit and the mounting area. Remove any obstacles, such as stored items, bikes, or bins, to give the installer easy access. If the cable route passes through a garage or an outbuilding, ensure the path is clear and that doors are unlocked.
For post-mounted chargers, the entire driveway needs to be free of vehicles and any clutter. The installer may need to dig a trench for the buried cable, so it’s important to mark any underground services like irrigation or lighting cables in advance. For everyone’s safety, keep pets and children well away from the work area throughout the installation.
Once the area is prepped, gather the necessary digital information to make the setup process as smooth as possible.
Information You’ll Need to Provide
Have your Wi-Fi network name (SSID) and password handy to connect the smart charger and set up the app. It’s a good idea to download the charger manufacturer’s app ahead of time, though the installer can assist with this if needed.
You might also need to provide details about your vehicle, such as its make and model, to confirm compatibility. Additionally, be ready to share information like your property’s address or MPAN (Meter Point Administration Number) if these details haven’t already been submitted. Being available to answer questions about cable routing, preferred mounting height, or any access restrictions will help the installer tailor the setup to your needs and avoid unnecessary delays.
Once you’ve organised these details, prepare for potential power interruptions during the installation.
Managing Disruptions
During a standard installation, expect the power to be off for 30–60 minutes while the installer connects the charger to your consumer unit and tests the system. If the job involves additional work, like installing an isolator or upgrading the consumer unit, the outage could extend to around 2 hours.
To minimise inconvenience, plan ahead: avoid scheduling critical online tasks, charge your devices in advance, and unplug sensitive equipment. If you depend on medical devices or work from home, let the installer know so they can adjust the timing to suit you. Many installers in the UK now send a text message on the morning of the installation with an estimated arrival time, making it easier to coordinate your day.
Safety and Legal Requirements
Why You Need a Certified Installer
Installing an EV charger yourself isn’t just risky – it’s against the law. It involves working with high currents, making it a notifiable electrical task. Attempting a DIY installation could void your insurance and even your vehicle warranty. That’s why it’s essential to hire a qualified electrician for the job.
Make sure to choose an installer who is NICEIC-registered and OZEV-authorised. For instance, EECO Energy, based in Northern Ireland, is a fully accredited MCS Registered Installer known for its reliable work. After the installation, your electrician will provide safety certificates and carry out the required tests to ensure everything meets the necessary standards.
Notifying NIE Networks
Legal compliance doesn’t stop at installation. Your installer must notify NIE Networks, Northern Ireland’s Distribution Network Operator (DNO), within 28 days of the installation. This notification allows the DNO to check if your property’s electrical system can handle the additional load. Most cases are approved within three working days, though delays can happen if upgrades or further assessments are needed.
The good news? You won’t have to deal with the paperwork. Your installer will handle all communication with NIE Networks on your behalf.
Planning Permission and Local Regulations
Besides electrical safety, it’s crucial to comply with planning and local building regulations. Generally, you won’t need planning permission to install a wall-mounted EV charger at a typical UK home. However, if your charging cable crosses a public footpath, it’s wise to check with your local council.
If you’re renting or living in a flat, you’ll need written approval from your landlord or property manager. For buildings with multiple occupants, such as flats or industrial units, the property owner’s permission is mandatory. Additionally, some properties may face extra restrictions, particularly in conservation areas or under specific local building rules. When in doubt, consult your local authority to avoid any surprises.
sbb-itb-d2d975a
After Installation: Support and Maintenance
Once your EV charger has been installed and passed all safety checks, the focus shifts to keeping it running smoothly. Regular maintenance and reliable support are essential to ensure your charger remains efficient and dependable over time.
Warranty and Customer Support
Most home EV chargers in the UK come with a 3-year warranty, though some high-end models may extend this to 7 years. These warranties typically cover manufacturing defects but exclude physical damage, improper installation, or issues caused by power surges (unless surge protection is included).
After installation, it’s important to register your charger online. This usually requires the serial number, proof of purchase, and the installation date. Your installer can help confirm registration. Support is often available through multiple channels, including a dedicated phone line, email, and online help centres. Many smart chargers also provide in-app support, enabling you to report issues, view error codes, or request a callback – most responses are handled within 1–2 working days.
Reputable installers often include post-installation support for up to 12 months. This covers technical problems, app connectivity, and basic troubleshooting. They can assist with setting up the charger’s companion app, configuring smart charging schedules, or fixing Wi-Fi pairing issues. If remote troubleshooting doesn’t resolve the problem, your installer will arrange an on-site visit, which is typically covered under the warranty or a service agreement, depending on the issue.
Security and Access Control
Modern home EV chargers include various options for access control. You can secure your charger in private mode using RFID cards, PIN codes, or app-based authentication, and even grant temporary access with time-limited credentials.
To keep your charger secure, follow best practices like using strong passwords, enabling two-factor authentication where possible, and regularly reviewing active users and access logs.
Maintenance Services
Home EV chargers require minimal upkeep, but a few routine checks can help maintain their performance. Inspect the charger and cable monthly for signs of damage, corrosion, or wear – particularly if the unit is installed outdoors. Ensure the mounting remains secure and that the surrounding area is clear and dry. For smart chargers, check the app periodically for firmware updates to keep your system running efficiently.
For added peace of mind, consider a premium service package. These plans, typically priced between £80 and £120 per year, often include an annual health check, firmware updates, and priority fault response. If your EV charger is integrated with solar panels or a home battery system, working with installers knowledgeable about these setups – such as EECO Energy, which specialises in solar and battery systems across Northern Ireland – can help you optimise your entire system and address any cross-system issues.
Grants and Financial Support
When planning an EV charger installation, exploring available grants can be a smart way to reduce the upfront costs.
Installing an EV charger comes with initial expenses, but there are government-backed grants and financial support options that can help offset these costs. For the latest funding opportunities and eligibility criteria, check the NI Direct website.
Who Can Access EV ChargePoint Grants
In Northern Ireland, government grants for domestic EV charger installations are somewhat limited. Eligibility typically depends on whether your property is suitable for a safe and efficient installation. Homeowners with off-street parking are usually eligible. For tenants or those in multi-occupancy buildings, securing the necessary permissions is essential.
Businesses and organisations may also benefit from targeted funding. For instance, the Energy Efficiency Capital Grant offers up to £150,000 for energy system upgrades, which can include EV chargers. To find out if your business qualifies, visit the NI Direct website for detailed eligibility requirements.
Once you confirm eligibility, a certified installer can guide you through the funding process, making it much easier to secure financial support.
How Installers Simplify Grant Applications
Certified installers in Northern Ireland, such as EECO Energy, often include grant application assistance as part of their service. This can be particularly helpful if you’re unfamiliar with the paperwork or technical requirements.
Installers will check that your property meets all necessary criteria, handle DNO (Distribution Network Operator) notifications within the required 28-day window, and provide essential documentation to prove certified installation and electrical compliance. By taking care of these steps, they ensure your installation meets funding conditions without causing delays to your EV charger setup.
Summary: What to Remember About EV Charger Installation
Installing an EV charger at home involves several straightforward steps. First, make sure you have off-street parking, arrange a home survey, and secure approval from your Distribution Network Operator (DNO). For most standard installations, the actual setup usually takes between 2 to 4 hours.
On the day of installation, clear the area around the installation site and have your Wi-Fi details ready if you’re setting up a smart charger. The installer will handle all the technical aspects, commission the charger, and guide you through app features if applicable.
It’s important to note that only certified professionals are legally authorised to install EV chargers. These experts will manage DNO approval, check that your electrical system can handle the load, and ensure everything complies with the latest safety standards. In Northern Ireland, companies like EECO Energy work closely with NIE Networks. They can also integrate your charger with solar panels and battery storage, which could lower your long-term energy costs.
After installation, you’ll benefit from warranty coverage and ongoing support for troubleshooting. For example, EECO Energy offers installations that are "Supported for years", giving you peace of mind knowing assistance is just a call away if needed. This thorough process ensures your EV charger is reliable and ready for the long haul.
FAQs
What are my options for installing an EV charger if I don’t have off-street parking?
If your property lacks off-street parking, you can still explore ways to set up an EV charger. The first step is to review your local council’s regulations, as some installations may require approval. Here are a couple of potential options:
- On-street charging options, including kerbside chargers or shared public charging points.
- Setting up a charger at a nearby location, such as a garage or a shared parking space.
Speaking with a professional installer can help you assess your circumstances and identify the most suitable solution.
How can I prepare my home for an EV charger installation?
Before setting up an EV charger at home, it’s crucial to have your electrical system evaluated by a qualified electrician. They’ll inspect your wiring and consumer unit to determine whether they can manage the additional demand. If necessary, they might suggest upgrades like adding a dedicated circuit or installing a residual current device (RCD) to enhance safety.
Make sure your electrical system meets UK safety regulations and that your power supply is adequate for the charger. These preparations will make the installation process straightforward and ensure your EV charger operates reliably.
What is the process for getting DNO approval to install an EV charger?
To install an EV charger, you’ll need approval from your local Distribution Network Operator (DNO). This involves submitting an application that includes details about the charger and your property’s electrical system. Typically, your installer will take care of this step, ensuring the charger complies with all necessary technical requirements.
Once the application is submitted, the DNO will review it. In some cases, they might conduct a site inspection to verify the setup. If everything checks out, they’ll grant the approval. Since this process can take a few weeks, it’s wise to factor this into your installation timeline.