If you’re thinking about installing solar panels, the first step is to assess whether your roof is a good fit. Here’s what you need to know:
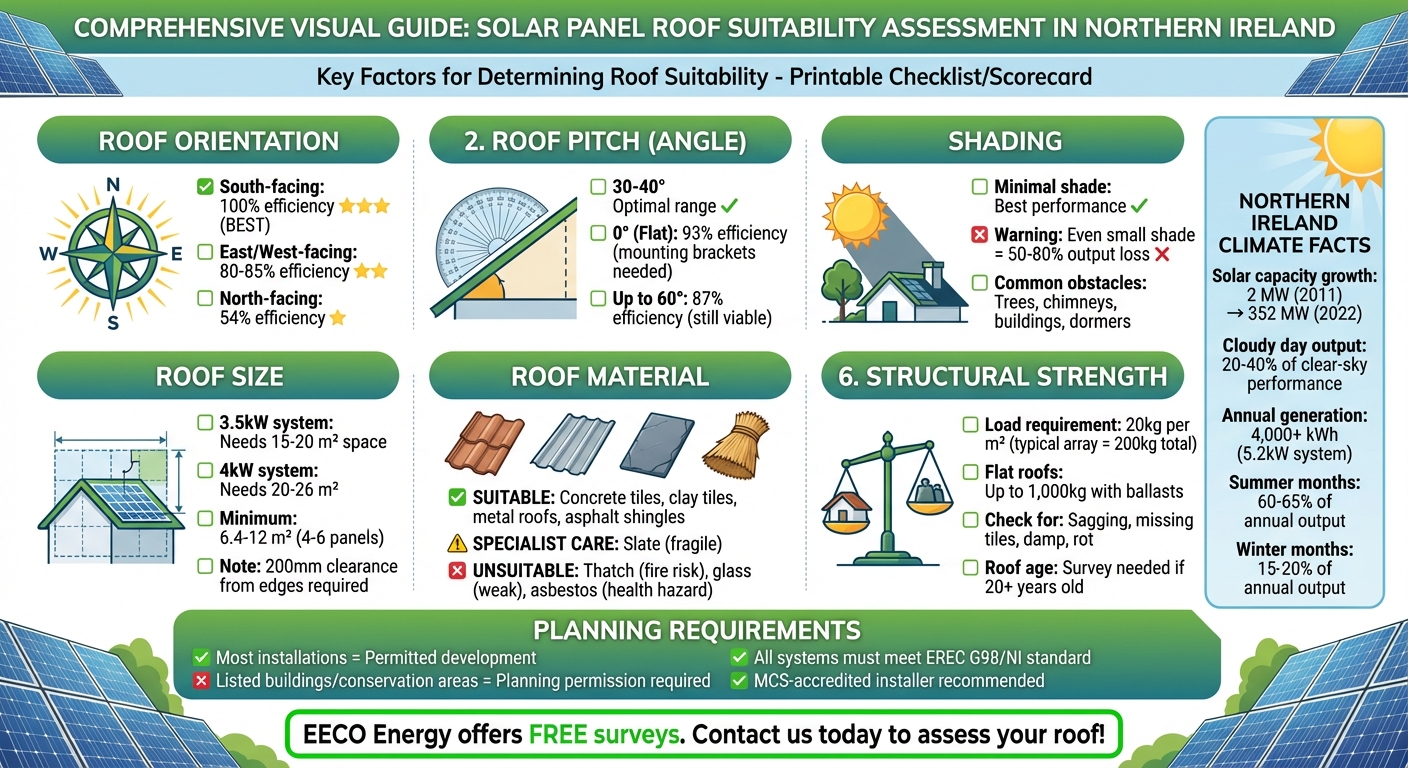
- Orientation: South-facing roofs generate the most energy, but east- and west-facing roofs are still effective. North-facing roofs produce less but remain viable with modern technology.
- Pitch: A roof angle between 30° and 40° works best, but other angles can still perform well with adjustments.
- Shading: Avoid areas with shadows from trees, chimneys, or nearby buildings. Even small amounts of shade can greatly reduce efficiency.
- Size: A 3.5kW system typically needs 15–20 m² of unobstructed roof space.
- Material: Concrete, clay tiles, and metal roofs are ideal, while slate and fragile materials require special care. Thatch, glass, and asbestos roofs are unsuitable.
- Structural Condition: Your roof must be strong enough to support the panels, which weigh about 20kg per square metre. Older or damaged roofs may need repairs first.
- Planning Rules: Most installations in Northern Ireland fall under permitted development, but listed buildings or conservation areas require planning permission.
Tools like PVGIS can help estimate your roof’s solar potential, but a professional survey is essential to confirm structural safety and compliance with regulations.
EECO Energy offers free surveys and tailored solutions, ensuring your system is designed for maximum efficiency and safety. With proper planning, even roofs in cloudy Northern Ireland can produce enough energy to save you money for years to come.
Solar Panel Roof Suitability Assessment Guide for Northern Ireland
Solar Suitability in Northern Ireland
Northern Ireland’s Solar Generation Potential
Solar energy in Northern Ireland has seen remarkable growth, with capacity increasing from just 2 MW in 2011 to 352 MW by 2022. While the region might be known for its cloudy skies, solar panels still perform effectively, generating 20–40% of their clear-sky output even on overcast days. For example, a typical 250W panel produces between 0.75 kWh and 1 kWh daily on average, while a standard 5.2 kW system can generate over 4,000 kWh annually.
Interestingly, Northern Ireland’s cooler climate provides an advantage. Solar panels lose about 0.4% efficiency for every degree Celsius above 25°C, meaning they often perform better here than in hotter regions where overheating can be an issue. On cold winter days, with temperatures around 5°C, panels can even exceed their rated output by as much as 10%. Additionally, the region’s frequent rainfall helps keep panels clean by naturally washing away dirt and debris, which could otherwise reduce efficiency.
Seasonal variation plays a bigger role than weather conditions. Between May and August, the summer months contribute around 60% to 65% of the annual energy output, while winter months (November to February) account for only 15% to 20%. This variation is primarily due to differences in daylight hours, which range from about 7 hours in December to 17 hours in June. Surprisingly, September and October can sometimes outperform the summer months, thanks to a combination of favourable weather patterns and cooler temperatures, which enhance panel efficiency.
These factors highlight how Northern Ireland’s unique conditions influence solar performance, setting the stage for evaluating whether your roof is suited for solar panels.
Main Factors That Determine Roof Suitability
When it comes to installing solar panels, four main factors determine whether your roof is a good fit. The first and most important is sunlight access. The orientation and pitch of your roof, as well as any shading from trees, chimneys, or nearby buildings, will directly impact how much energy your system can generate during the region’s limited peak sun hours (typically 3 to 4 hours daily).
Next is structural integrity. Your roof needs to be strong enough to support the weight of solar panels for over 25 years, and the materials must be compatible with mounting systems. Available roof space is another key consideration. You’ll need enough unobstructed area to install a system that meets your energy requirements. Lastly, compliance with local planning regulations is essential. This includes adhering to planning permissions and meeting NIE Networks‘ EREC G98/NI standard for grid connection.
Each of these factors plays a critical role in determining your roof’s solar potential, and we’ll explore them further in the next steps.
Step 1: Check Your Roof’s Direction and Angle
Best Roof Direction for Solar Panels
South-facing roofs are ideal for solar panels, as they receive the most direct sunlight and can generate up to 100% of the expected energy output. If your roof faces south, you’re in a prime position to maximise solar energy production.
That said, east and west-facing roofs also perform well, typically achieving 80–85% of the output of south-facing panels. East-facing panels are most effective in the morning, while west-facing panels excel in the afternoon and evening. Some homeowners opt to split their solar array between east and west to maintain a steady energy supply throughout the day.
While north-facing roofs are less efficient, modern solar technology still makes them viable, with an output of around 54% compared to a south-facing system.
To determine your roof’s orientation, you can use a smartphone compass app or Google Maps. Alternatively, you can stand with your back to the roof and observe where the sun sets: if it sets directly in front of you, your roof faces west; if it sets to your right, it’s south-facing; and if it sets to your left, it’s north-facing.
Once you’ve confirmed your roof’s direction, it’s time to check the angle for optimal solar performance.
Measuring Your Roof Pitch
In the UK, the best roof pitch for solar panels falls between 30° and 40°. This range allows the panels to capture sunlight efficiently throughout the year while ensuring rainwater can wash away dirt and debris.
You can estimate your roof’s pitch using a smartphone clinometer or level app. If you can access your loft, examining the rafters can also give you a better understanding of your roof’s structure and angle. Even if your roof’s pitch doesn’t fall within the 30–40° range, solar panels can still perform well. For example, steeper angles up to 60° or even horizontal installations can generate considerable electricity.
For flat roofs, installers typically use mounting brackets or ballasts to position the panels at the optimal tilt. Keep in mind that panels tilted less than 12° may not self-clean effectively, leading to potential dirt accumulation.
| Roof Orientation | Pitch Angle | Estimated Efficiency |
|---|---|---|
| South | 30° (Ideal) | 100% |
| South | 0° (Flat) | 93% |
| East / West | 30° | 78%–93% |
| South | 60° | 87% |
| North | 30° | ~54% |
Step 2: Check for Shade and Sunlight Access
What Causes Shading on Your Roof
Getting the most out of your solar panels means making sure they soak up as much sunlight as possible. However, shading can be a major roadblock. Even a single shaded solar cell can slash a panel’s output by a staggering 50–80%.
Shading can come from various sources. External factors like nearby buildings, tall trees, utility poles, and power lines often cause shadows. On your roof, features such as chimneys, vent pipes, dormers, flue pipes, gable structures, or antennae can also cast shade. Seasonal changes play a big role too – objects that don’t block sunlight in summer might cast long shadows in winter when the sun hangs lower in the sky. On flat roofs, improper panel spacing can even lead to panels shading one another. Beyond just reducing energy production, shading can create "hot spots", where shaded cells can heat up to nearly 100°C, potentially causing permanent damage to the panels.
Once you understand where shading might come from, it’s time to roll up your sleeves and assess your roof for potential issues.
How to Check for Shading Yourself
Now that you know what to look for, here’s how you can evaluate shading on your roof. This step is key to ensuring your solar setup operates at its best.
Start by observing your roof at different times of the day to track how shadows move. Solar path apps and aerial views can help pinpoint obstacles. Tools like Google Maps or Google Earth are great for spotting tall buildings or trees nearby that might not be immediately obvious from the ground. For a quick way to estimate shadow lengths, measure the height of an object (like a tree or chimney) and multiply it by three – this gives you a rough idea of how far its shadow will stretch during peak sunlight hours.
If some shading is inevitable, don’t worry. Talk to your installer about using micro-inverters or optimisers, which ensure that a single shaded panel doesn’t drag down the performance of the entire system. You could also consider trimming overhanging branches or relocating roof-mounted equipment like antennae to areas with better sunlight access.
Step 3: Measure Roof Size and Check Roof Material
Working Out Your Usable Roof Area
Start by measuring your roof’s total area. One easy way to do this is by using Google Maps’ ‘Measure Distance’ tool. Simply right-click on your building in satellite view and trace the edges of your roof to calculate the area in square metres. If your roof is sloped, remember to adjust for the angle – slopes like a 30° pitch can increase the measurable surface area by about 15%.
Next, subtract the space taken up by features like chimneys, skylights, vent pipes, and dormers. Keep in mind that building regulations require solar panels to be positioned at least 200mm away from the edge of the roof or wall. Installers also typically leave a 3cm gap between individual panels. Dormer windows can be particularly tricky since they’re not usually designed to support the weight of solar panels, meaning that space is not usable.
"The average solar panel takes up 2m², and your installer should leave reasonable space on each side of the array, as well as 3cm between every panel." – Sunsave
As a general rule of thumb, a 3kW solar system needs roughly 15–20 m² of usable roof space, while a 4kW system requires about 20–26 m². If your roof is smaller, you may still be able to install a system with space for 4 to 6 panels, which translates to around 6.4 m² to 12 m².
Once you’ve worked out how much space you have, the next step is to check whether your roof material is suitable for a solar installation.
Roof Materials and Solar Panel Compatibility
Not all roof materials are equally suited for solar panels. Concrete and clay tiles, commonly found in Northern Ireland, are excellent options. These materials are durable enough to handle the extra weight of solar panels and often outlast the panels themselves. Metal roofs, especially standing seam types, are another great choice because panels can be clamped onto the ridges without requiring any drilling.
Slate roofs, however, can be more challenging. Slate is fragile and brittle, so installing solar panels typically requires specialist knowledge and customised mounting systems to avoid damaging the tiles. Asphalt shingles and composite materials are among the easiest to work with, offering both durability and straightforward installation.
Some materials are simply unsuitable for solar panels. Thatch roofs pose a significant fire risk, glass lacks the structural strength needed, and asbestos is a health hazard – most installers won’t work on these roofs. Flat roofs, on the other hand, are highly suitable for solar panels. They just require mounting frames or ballasted systems to achieve the ideal tilt angle of 30–40°.
"Concrete and clay tiles are popular materials used for roofs in the UK and are common when installing solar panels. Their durability and longevity mean that they can hold the extra weight and match or exceed the lifespan of your solar system." – Going Green Renewables
Step 4: Check Your Roof’s Condition and Strength
Warning Signs of Roof Problems
Before installing solar panels, it’s crucial to assess your roof’s condition to ensure it can handle the added weight. A typical solar array weighs about 200kg, or approximately 20kg per square metre. While most roofs in the UK can manage this load, older or damaged roofs might struggle.
Start with a visual inspection from the ground. Look for sagging or bowing rooflines, uneven ridges, missing or cracked tiles, and excessive moss. These could signal the need for repairs before installation. Inside your loft, check for damp patches, mould, torn felt, or any light coming through the roof boards. Cracks in your ceilings or walls may also indicate structural stress.
Be aware that spray foam insulation can hide signs of leaks or rot, making it harder for installers to evaluate the roof’s condition. Similarly, vaulted ceilings can limit access to the roof structure, complicating the secure installation of mounting bolts.
"It’s difficult to verify whether a flat roof is strong enough for solar panels, as we’re not able to see the rafters. These systems will be heavy because they need ballasts to weigh them down, and if the roof isn’t structurally sound then you’ll end up with a pretty dangerous scenario." – Tom Brehme, Technical Manager, Sunsave
If you notice any of these warning signs or are uncertain about your roof’s condition, it’s best to arrange a professional structural survey.
When You Need a Structural Survey
If your roof is over 20 years old or shows any of the issues mentioned earlier, a structural survey is essential before installing solar panels that are built to last 25 years or more. A survey is also critical if your loft is inaccessible, as installers need to inspect the rafters and roof felt to properly secure the mounting system.
Flat roofs require extra attention. Since drilling into flat roofs can lead to leaks, installers often use heavy ballasts instead. This adds around 80kg per panel, potentially bringing the total system weight to over 1,000kg – about five times heavier than a standard pitched roof installation. In such cases, a structural engineer should evaluate your flat roof to confirm it can handle the additional load. If there’s any doubt about your roof’s strength, a structural survey can help you avoid expensive problems down the line.
sbb-itb-d2d975a
Step 5: Check Planning Rules and Building Regulations
Permitted Development Rules
Once you’ve assessed your roof’s suitability, the next step is to ensure your solar panel installation complies with planning rules and building regulations.
In Northern Ireland, most solar panel installations fall under permitted development, meaning you typically won’t need planning permission. This applies to various property types, including detached, semi-detached, and terraced houses, as well as many outbuildings. However, there are exceptions where planning permission is mandatory.
For instance, if your property is a listed building or located within a conservation area, you must secure planning permission before proceeding with the installation. Ignoring this requirement could result in severe penalties, including fines of up to £30,000 or even a six-month prison sentence. To avoid complications, it’s wise to consult your local divisional planning office before starting the project. Trying to obtain permission after installation can be both costly and challenging.
Even if planning permission isn’t required, your installation must still meet certain conditions to qualify as permitted development. The solar panels must not extend more than 200mm beyond the roof’s surface or rise above the highest point of the roof (excluding chimneys). Additionally, they should be installed in a way that minimises their impact on the building’s appearance and the surrounding environment.
Once you’ve confirmed compliance with planning rules, it’s time to focus on the technical requirements for installation.
Installation Requirements in Northern Ireland
Beyond planning considerations, all solar installations must adhere to strict building regulations to ensure they are structurally and electrically safe. These regulations apply regardless of whether planning permission is required.
Your installer will need to confirm that your roof can handle the additional weight of the solar panels and that the system meets the EREC G98/NI standard for grid connection. After installation, the system must be registered with NIE Networks to ensure it is safely connected to the electrical grid.
To simplify the process, consider hiring an installer accredited by the Microgeneration Certification Scheme (MCS). MCS-accredited installers can self-certify that their work complies with all necessary building regulations, eliminating the need for separate inspections. This ensures your installation is not only safe but also fully compliant with the required standards.
Free Tools to Check Your Roof’s Solar Potential
Solar Maps and Sunlight Calculators
Online tools can help you get a quick estimate of your roof’s potential for solar energy generation. These tools rely on satellite imagery, LiDAR data, and energy models to calculate how much electricity your roof could produce.
Take PVGIS (Photovoltaic Geographical Information System), for instance. Offered by the European Commission, it provides detailed solar irradiation data for locations across Northern Ireland. Just pop in your postcode, and it will estimate your system’s yearly energy output. Similarly, PV*SOL online is a free simulator that models solar panel systems and predicts their potential energy yield.
These tools typically evaluate factors like your roof’s orientation, pitch, and available surface area, while also factoring in shading from nearby structures or trees. Some advanced tools even identify obstacles such as skylights or vents.
Additionally, many solar installers now offer free remote surveys using 3D modelling. These assessments, often completed within 24–48 hours, provide a more refined look at your roof’s solar potential.
While these tools are great for initial research, keep in mind that their accuracy may vary depending on specific conditions.
Why DIY Tools Have Limits
Although online calculators are convenient, they’re no substitute for a professional site survey.
LiDAR data, for example, usually has a resolution of about one metre, which means it might overlook smaller details like dormer windows, pipes, or vents that reduce usable roof space. These tools also can’t evaluate the structural condition of your roof – things like weakened rafters, rot, or other damage. And they don’t account for local grid restrictions, which could limit the size of your solar system.
So, while these tools are helpful for early planning, they should only be used as a starting point. A professional inspection is essential to check your roof’s material compatibility, load-bearing capacity, and to design a system that fits your specific needs.
How EECO Energy Assesses Your Roof

EECO Energy’s Site Survey Process
EECO Energy carries out a thorough on-site inspection to determine if your roof is suitable for solar panels. During the visit, a technician evaluates the orientation and pitch of your roof to see how well it aligns with ideal solar conditions. This careful approach is part of EECO Energy’s commitment to optimising system performance.
Beyond orientation and pitch, the survey also examines shading and structural factors that might impact the efficiency of your solar panels. A detailed shading analysis identifies any obstructions – like trees or nearby buildings – that could reduce energy output. Where issues are found, the technician suggests practical solutions to address them.
The structural condition of your roof is equally important. The technician inspects your loft to assess the state of rafters and roof felt, ensuring the structure can safely support the solar array. They also measure the available space for installation, taking into account features like skylights, vents, and chimneys while maintaining necessary safety clearances. For a standard 3.5kW to 4kW system, about 20 to 28 square metres of clear, unobstructed space is required.
Customised Solar Solutions for Your Roof
Once the survey is complete, EECO Energy uses the findings to create a solar solution tailored to your roof’s specific characteristics. If your roof faces east or west instead of south, the system is adjusted to account for roughly 20% lower energy generation compared to a south-facing setup. For flat roofs, mounting brackets are used to tilt the panels to the optimal angle, sometimes employing a ballasted system to achieve the right positioning.
The type of mounting system depends on your roof’s material. While asphalt and metal roofs are relatively straightforward to work with, clay, slate, or stone tiles require more complex "lift and secure" techniques. EECO Energy also offers the option of battery storage, enabling you to save unused energy for later use, such as during evenings or overcast days.
Every system comes with a 25-year warranty and is installed by MCS-accredited engineers. Most installations are completed in just one day. EECO Energy provides free surveys and quotes throughout Northern Ireland, ensuring your solar system is designed to deliver maximum energy savings based on your home’s unique conditions.
Conclusion
When assessing your roof for solar panels, consider key factors like its orientation, pitch, shading, available space, material, and structural integrity. Ideally, south-facing roofs with a pitch of 30–40° deliver the best performance. However, thanks to advancements in technology, east, west, and even north-facing roofs can still be effective. For a typical 3.5kW system, you’ll need about 20 square metres of unobstructed space, and your roof must be able to support a load of roughly 20kg per square metre.
While DIY tools can provide a basic overview, only a professional survey can uncover hidden issues such as structural concerns or complex shading patterns. EECO Energy offers free surveys across Northern Ireland, carried out by MCS-accredited engineers who thoroughly evaluate your roof’s condition, orientation, and shading. With a 25-year warranty included on every system and most installations completed within a single day, they ensure your solar setup is tailored to your home and optimised for local weather conditions.
FAQs
What can I do if part of my roof is shaded?
If part of your roof is shaded, there are practical steps you can take to reduce its effect on your solar system’s performance. A solar expert can assess the situation and recommend solutions, such as trimming nearby trees, relocating panels to sunnier spots on your roof, or installing micro-inverters or power optimisers to boost energy production from shaded panels.
You might also consider using a solar suitability calculator. These tools can estimate how shading impacts your roof’s solar potential, helping you make well-informed choices to optimise your system’s efficiency.
How can I tell if my roof material is suitable for solar panels?
If you’re considering solar panels, it’s important to know whether your roof material can handle them. Materials like asphalt shingles, metal, and tiles are usually well-suited for solar installations. On the other hand, roofs made from thatch, asbestos, or glass are generally not suitable.
To be certain, a professional installer can inspect your roof. They’ll check its condition, assess whether it can bear the weight of the panels, and ensure it has the structural strength and durability needed for a safe and effective installation.
Do I need planning permission to install solar panels on my roof in Northern Ireland?
In Northern Ireland, installing solar panels on your roof usually doesn’t require planning permission, as they fall under what’s known as permitted development. That said, there are exceptions to this rule. For instance, if your home is a listed building, located in a conservation area, or if the installation would drastically change the appearance of your property, you might need to seek approval.
To avoid any surprises, it’s wise to consult your local planning authority. They can provide clarity on any specific rules or restrictions that could apply to your property.